A DIY outdoor privacy screen is a great addition to any backyard or patio. It can provide privacy from neighbors (or unsightly grinder pumps), as well as a stylish and modern look to your outdoor space. For under $100 and a just a few hours, let me show you how I built my own DIY wood outdoor privacy screen.
There are many different designs and styles to choose from when it comes to building a wooden privacy screens. Some people opt for a more traditional look, while others prefer a more contemporary design with decorative privacy screen panels. I chose to keep it simple and budget friendly.
Not only is building your own privacy screen a cost-effective option, it also allows you to create a unique and perfect addition to your outdoor space.
Let me show you the reason I wanted to build a wooden privacy screen for our patio.

Right off the porch is our lovely grinder pump. The purpose of a grinder pump is to push the sewage out to the city sewer in flat areas where using gravity to aid the flow of water isn’t an option. I previously built an outdoor table to hide it the grinder pump well. It was fine until we needed to access it and then it just became a pain to work around. I also wanted this space to feel like a private space or personal space; like it’s own outdoor room and as long as this wall was open, it just didn’t.

Instead of physically covering the grinder well, I decided to hide it. Let me show you how I built this privacy screen.
Disclosure; this post contains affiliate links. As an Amazon Associate I earn from qualifying purchases. This disclosure statement refers to the rest of the Amazon links in this post.
P.S. Not wanting to DIY your own outdoor screen? Check out my list of ten great top rated outdoor privacy screens here! Buying a premade panel screen is a good alternative if you aren’t up for making your own. Lattice privacy screens are also a good alternative if you don’t like the slatted wood look.

Materials Needed
Creating DIY wood privacy screens requires a few essential materials. Here are the materials you will need:
- 1x6x10 pressure-treated boards ( I used 5/4″ by 6″ by 10′ pine boards)
- 1 1/4-inch pocket hole screws
- 2-inch deck screws
- Stain or paint
- Paintbrush or stain applicator
- Power drill
- Miter saw
- Measuring tape
- Pencil
- Safety glasses
- Kreg Jig
When purchasing wood for your DIY project, it is important to choose pressure-treated boards as they are more durable, water resistant and resistant to rot and decay. The size of the wood will depend on the size of the patio privacy screen you want to create. Always measure the area where you plan to install the screen before purchasing materials to ensure that you have enough wood.
I did not purchase high grade wood products. These are general old pine deck boards. I knew I was going to paint them, so why pay more for a more polished real wood product?

Measurements and Planning
First, measure the area where the privacy screen will be installed. Take note of the length, height, and depth of the space. This will help determine the size of the planks needed and how many will be required.
Next, decide on the design of the screen. Will it be a simple, straight design or will it have angles or curves? This will affect the number of planks needed and the difficulty of the project. Will additional hardware such as hinges or screws be required? Make a list of all necessary materials and tools before beginning the project.
Make sure to use weather-resistant materials or applying an exterior protective coating to ensure it lasts for years to come. We live near the beach, so heavy wind and bad weather is common for our outdoor area. This is another reason I decided to use heavy duty deck boards and not nicer wood slats.
Preparing the Wood
Before starting the construction of the outdoor planked privacy screen, make sure to choose the right wood. The preparation process involves choosing the right type of wood and measuring and cutting the planks to size.
The first step is to choose the type of wood that will be used for the project. Cedar wood or redwood are popular choices for outdoor projects due to their natural resistance to decay and insects. Other suitable options include pine, cypress, and spruce.
I chose to keep my project simple and budget friendly by purchasing simple pine deck boards. If you do choose a lower grade wood product, make sure to inspect each piece of wood before you purchase it for defects.
Next, measure the planks to the desired size using a measuring tape and pencil. Use a miter saw to cut the planks to the appropriate length and width.
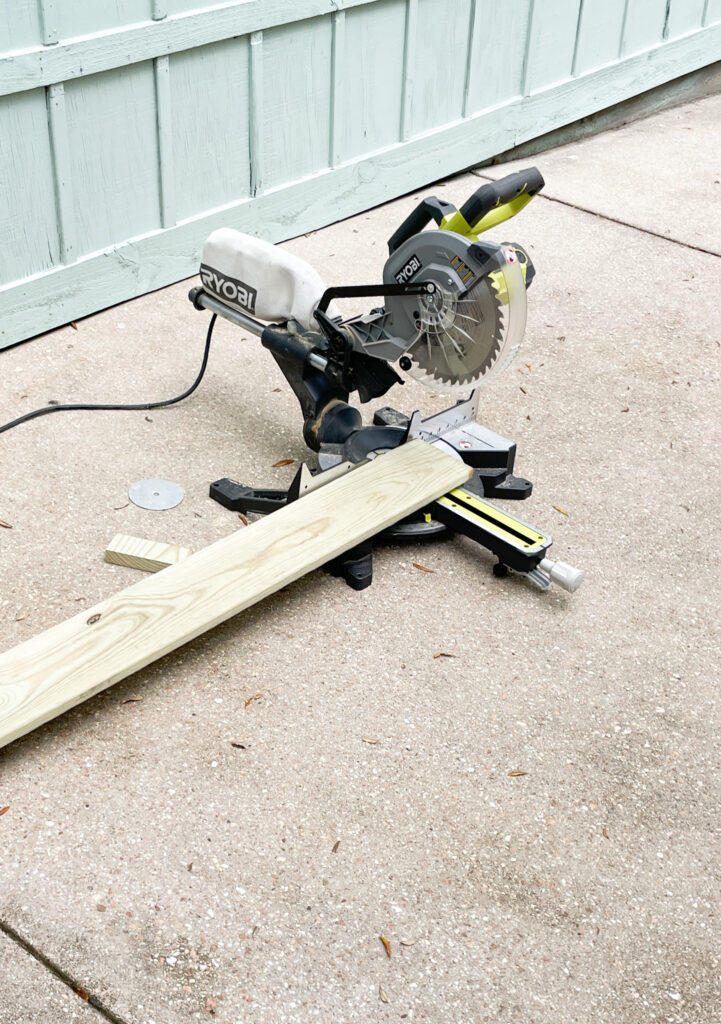
Optional; After cutting the planks, you can sand them thoroughly to ensure that the surface is smooth and free of any rough edges or splinters. Use a coarse grit sandpaper to remove any imperfections, followed by a finer grit sandpaper to achieve a smooth finish. Be sure to sand the edges of the planks as well to prevent any sharp edges.
I opted not to sand because I knew I would be painting the boards. If you plan to stain the boards, I would probably recommend sanding the wood first.
Since I attached the wood to the house on one side and the porch posts on the other, I drilled pocket holes with a Kreg jig on one side to attach to the wood siding on the house.


Once the wood is prepared, it is ready to be assembled into the privacy screen.
Building the Frame
Building the frame is the first step in constructing a DIY outdoor planked privacy screen. The wooden frame is the backbone of the entire structure, and needs to be sturdy enough to support the weight of the planks and withstand the elements.
In my case with my privacy screen, I already had the “frame” of the house to work with. Luckily, I didn’t have to complete this step but if you don’t have a frame already, read on!
The first thing to do is to determine the size of the frame. Measure the area where the privacy screen will be placed and determine the height and width of the frame. Then, cut the lumber to size using a saw. Make sure to use pressure-treated lumber, as it is more resistant to rot and decay.
Next, assemble the frame by attaching the pieces of lumber together using screws or nails. Use a level to ensure that the frame is straight and square. Reinforce the joints with metal brackets or corner braces to add extra stability.
If the privacy screen will be freestanding, add additional support by attaching diagonal braces to the corners of the frame and attaching them to a post of your choosing. This will prevent the frame from wobbling or tipping over in windy conditions.
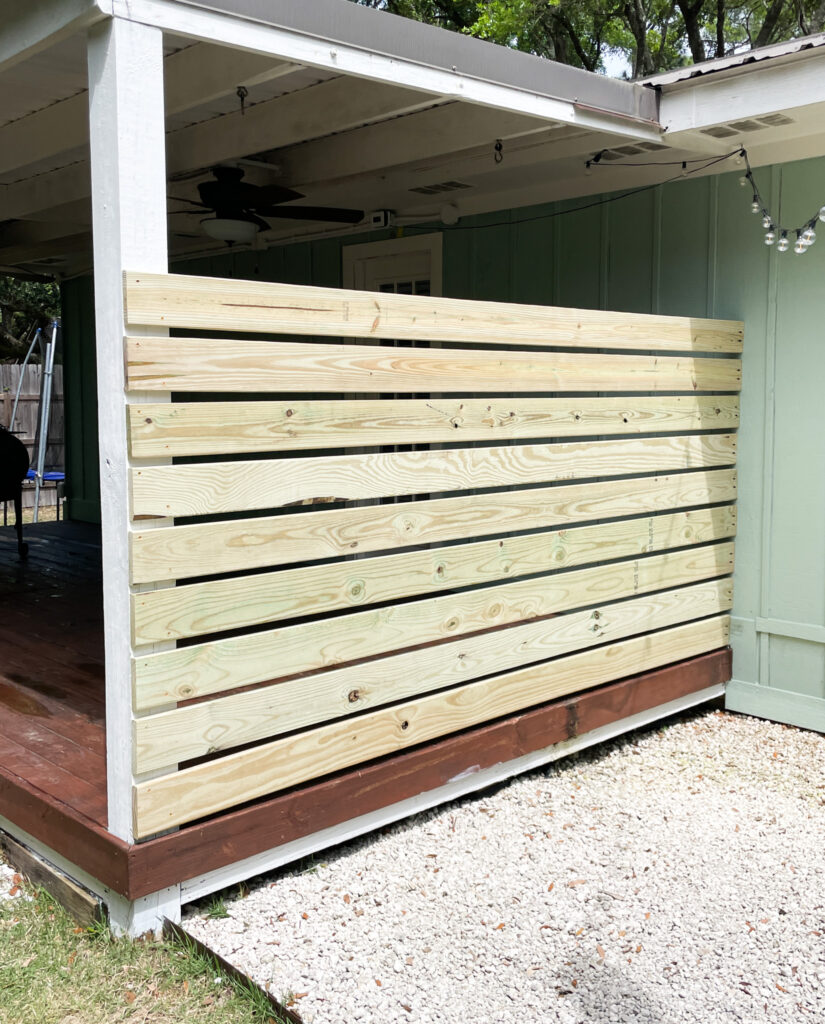
Once the frame is complete, it’s time to attach the planks. This is done by screwing or nailing the planks to the frame. Make sure to space the planks evenly and leave a small gap between each plank for ventilation.
Attaching the Planks for the planked porch screen
Start with the bottom plank, ensuring it is level and flush with the bottom of the frame (or house). Use a nail gun or screws and drill to secure the plank to the frame.
In my case I used pocket hole screws to attach to the house on one side and then I drilled screws directly into the porch post on the other side.


Once the bottom plank is attached, move on to the next plank, making sure it is level with the first plank and leaving a small gap between the two planks for expansion. I used a scrap piece of wood to space the planks with.This was the perfect solution to get the right space.

Continue attaching planks in this manner until the entire privacy screen is covered.

You can see the small wood piece I’m using at the top of the planks to create the “space between” each.
Pro Tip; For a more decorative look, consider alternating the direction of the planks or using different widths of planks. Staining or painting the planks before attaching them can add a pop of color or texture to the screen.
When attaching the planks, it’s important to use galvanized or stainless steel nails to prevent rusting over time. If using screws instead of nails, make sure they are also rust-resistant and long enough to securely attach the planks to the frame.
Stain or Paint
You will more than likely want to stain or paint the wood planks when you are done. Like I said earlier in the post, I chose to paint them white.
I used an Kilz outdoor primer and paint product in the color white. I applied 2 coats. If you paint the planks, make sure they are dried out first and also make sure to use a primer product so there is no bleed through!
Related Post;
Can you Paint Pressure Treated Wood?

Finishing Touches
After constructing the DIY outdoor panel privacy screen, it’s time to add the finishing touches to make it look polished and complete. Here are a few ideas:
- Add Greenery: To make the screen blend in with the surrounding landscape, you can add some potted plants or hanging baskets to the top or sides of the screen. This will also help to create a more private and secluded space.
- Hanging Decor: Another way to add some personality to the screen is by hanging outdoor decor such as lanterns, wind chimes, or string lights. This will not only add visual interest but also create a cozy ambiance for your outdoor space.


I think my favorite view is from this angle. I love how the wood slats accent the house perfectly!
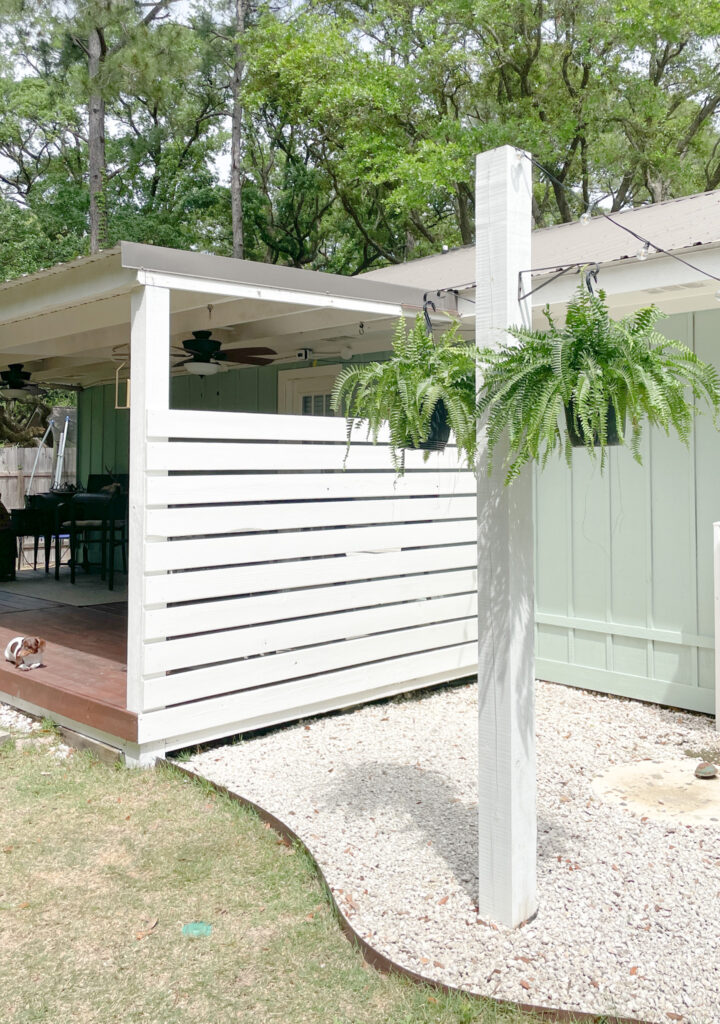

I feel like this space is finished now!


Want to see more outdoor projects?
Rustic Cottage Outdoor Makeover before and After

DIY Gravel Patio with Solar String Lights


Our backyard has taken on many different faces over the last four years. So far I’m pleased with this simple DIY and can’t wait to spend more time out here!
As always, thanks for being here.
Lindsey**


