This is a full review of the Homax Tough as Tile refinishing kit in the spray paint form and paint can form. I’ve shared all my thoughts with a step-by-step tutorial on how I painted my kitchen tile backsplash and transformed it with a beautiful new white gloss finish.
I’m in the process of giving my kitchen a mini makeover. Our plan (shortly after we moved in four years ago) was to gut the old 1980’s kitchen and install a brand new one with new kitchen cabinets.
Fast forward four years, a global pandemic, crazy inflation and mass shortages. Let’s just say that brand new kitchen is on hold…possibly indefinitely.
Since I’m no stranger to a budget kitchen makeover, I figured it was time put those new kitchen dreams aside. That’s when I pulled up my sleeves and prepared the coats of paint to give this space a new look. After all, a space doesn’t have to be brand new to be stunning, functional and beautiful right?
Disclosure; this post contains affiliate links. As an Amazon Associate I earn from qualifying purchases. This disclosure statement refers to the rest of the Amazon links in this post.
Speaking of functional, I’ve already done some quick renovations in this kitchen that have made a big difference in work flow:
- Replacing Drawer Slides
- Adding kitchen cabinet pull outs
- Removing old cabinet and adding a new one to the kitchen cubby area
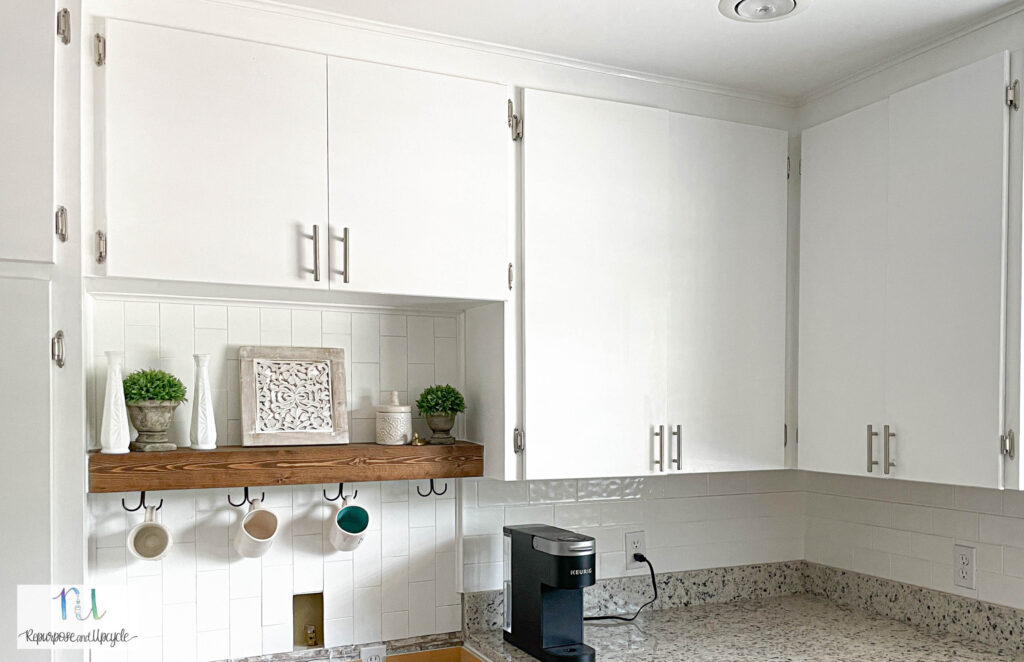
Update; See the full kitchen update with shiplap range hood and painted subway tile with DIY coffee bar here!
Back to painting the kitchen tile backsplash…
I’m also no stranger to painting tile. Check out how I updated 400 sq feet with painted tile floors in our back house here. If you’ve been around my blog long enough, you know I love to transform anything with paint!
I recently did a lot of research about the best tile paint for a beautiful long lasting finish. I even searched out a handful of bloggers who shared their awesome painted tile tutorials.
Of all of these products I decided to choose the Homax tough as tile product to paint our tile kitchen backsplash. Homax is an epoxy enamel paint that is known for durability.
One quick note; I went back and forth about using a tub and tile paint vs. regular old paint. Ultimately, I wanted a long lasting super durable finish. I knew it would be a good idea if I chose a paint designed specifically for the kitchen and bath. Would it have been easier to go with a regular old paint and primer product? Yes probably. Like I said though, I wanted durability. So here we go…
I chose this product for a few reasons;
- Great for glazed tile
- Leaves a high gloss finish
- Kit comes with all supplies needed to clean and prepare the backsplash tiles
- easy aerosol cans
- affordable

The kitchen before the painted tile
Here is a quick look at what our kitchen looked like before this project. The existing tile didn’t look bad, I just wanted to brighten the space with white tile.
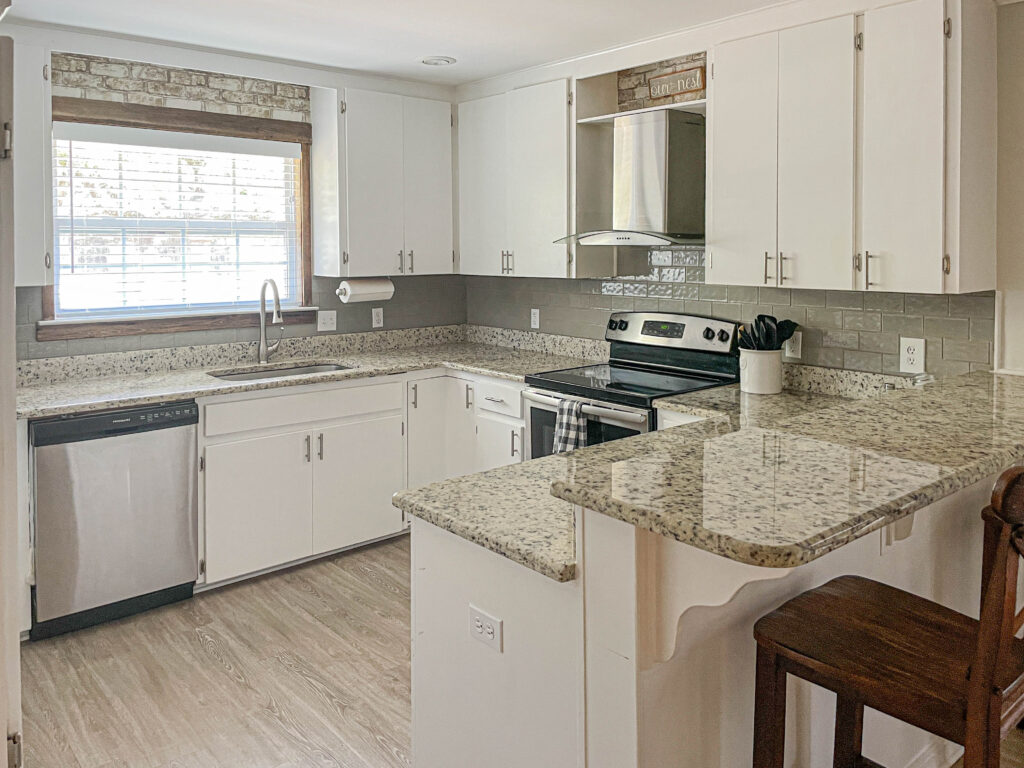
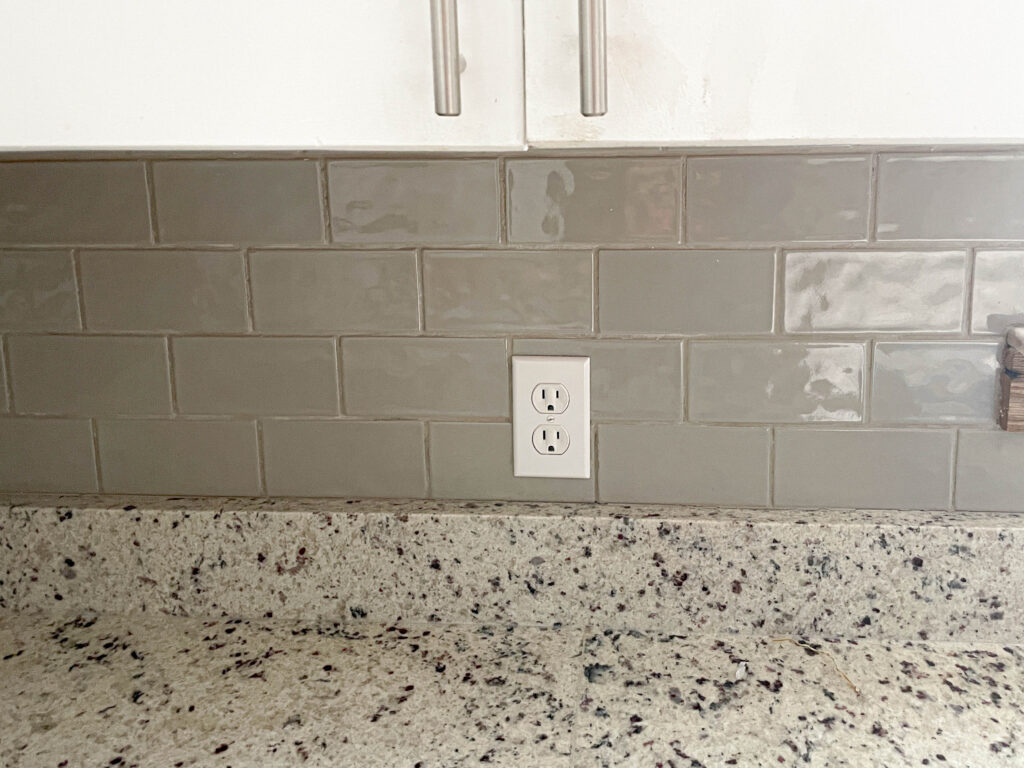

I’ve never been a fan of the gray tile with gray grout. I decided a while ago that I wanted to paint it all white.
How to prepare the kitchen tile backsplash for Homax tile paint
A lot of the Homax Tough as Tile kits come with gloves, steel wool and surface prep cleaner. Surface preparation (for any project) is key to giving it that long lasting finish and to make the new paint stick.
For those that didn’t buy a kit, follow the instructions from Homax on how to properly prepare the surface.
Note; Before you begin preparing the surface you need to remove any existing caulk. Luckily, we didn’t have any caulk applied anywhere so I didn’t have to worry about that.
This is what I used to clean our kitchen tile before applying the Homax product:
- gloves
- cleaning product- If you don’t buy the kit, Krud Kutter also works well to clean the surface
- steel wool pad
- TSP
- Isopropyl alcohol
- lint free rag
- painter’s tape
- grit sandpaper
Here is how I prepared the tile surface;
- Cleaned the tile with a regular non oily cleaner
- Rinsed the area thoroughly with water
- Used a steel wool pad and a TSP solution and applied to the entire area
- Cleaned the surface twice with steel wool pad and cleaner
- Used a lint free cloth and Isopropyl alcohol to wipe the surface clean and dry
- Once the surface was clean and dry I taped off the area with Frog Tape and put a drop cloth on the granite
1st coat of Homax Tough As Tile spray paint on glazed kitchen tiles
I’m going to be honest; the first coat of paint did not go as planned. The paint is much thinner and runnier than I expected.
You can see how blotchy it looks and in some areas runny. I didn’t expect it to look good, but I’m almost embarrassed to show you these.

You can see around the outlet covers and the window where the paint didn’t adhere well and created a splotchy finish.
When you see these areas that didn’t spray evenly, my best guess is that that is an area I didn’t clean well with the alcohol. Ugh. I could be wrong because I thought I cleaned it well enough, but maybe not.
Good thing I only applied it to a small section of the kitchen and not the entire tile surface.

That’s when I realized I needed to do some light sanding and then more cleaning and readjust my project plan.

After living with the fumes, overspray and white chalky dust for a day or so, I made an executive decision. I decided NOT to continue with the spray paint product but purchase the Homax tile paint kit instead for this painted backsplash project.
Homax Tough as Tile Spray kit
The spray paint will probably leave a more even finish than the paint product, but the odor (and probably toxicity) was overwhelming. Because our kitchen is in the middle of our house, I had no way of “sectioning” it off to let the fumes die down.
Also, the dust from the overspray, or should I say, just the dust in general was a wee bit too much for me.
I would imagine the spray paint would be good to use in a bathroom with a large window that you could open up and shut the door to keep the fumes out. In our case, I just couldn’t get around the entire house smelling like a paint factory for days.
So now what?
Homax tough as tile paint also comes in a paint form. I opted to purchase this.
Before I applied the next coat, I did sand the areas that had a lot of “bubbles” (pictured above). It helped remove them but not totally. After I sanded them with a very fine grit sanding block, I cleaned the surface and used the tack cloth to ensure there was no dust.
Using Homax Tough as Tile Paint Kit with a synthetic brush
The instructions said to stir (NOT SHAKE) the paint can before use. After I stirred it real well, I grabbed my gloves, 2″ synthetic bristle brush (the paint kit comes with the wrong type of brush FYI), N95 mask, and opened the window and let the fan full blast. Here we go again…
The paint is still very thin and runny like the spray paint and man oh man does it dry fast! Keep in mind your dry time folks!
The brush did a good job of covering the grout lines but it left a few (or a lot) of brush strokes.
Check out my video for all the specifics, but below I’ve attached a few pictures after the brush coat was complete.

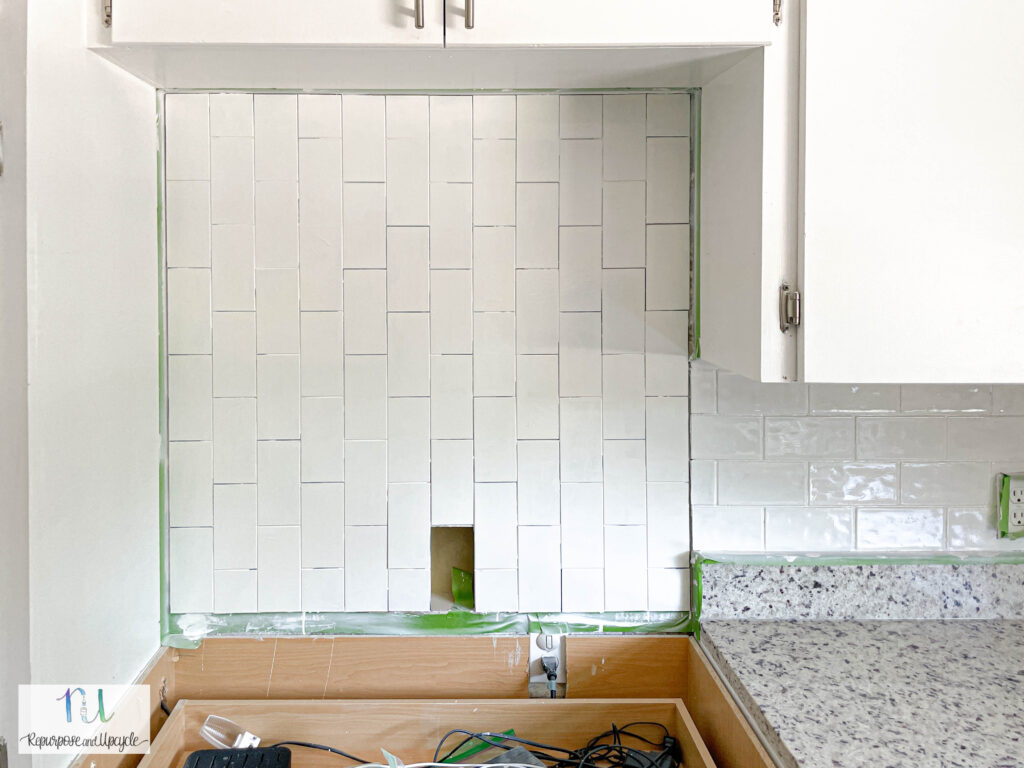
I still wasn’t happy with the way the faux tiles looked with the paint, but the paint looked great on the glazed tiles. So far It’s making a huge impact and I’m loving it. I crossed my fingers that the remaining coats of paint would make the faux tiles look great too.

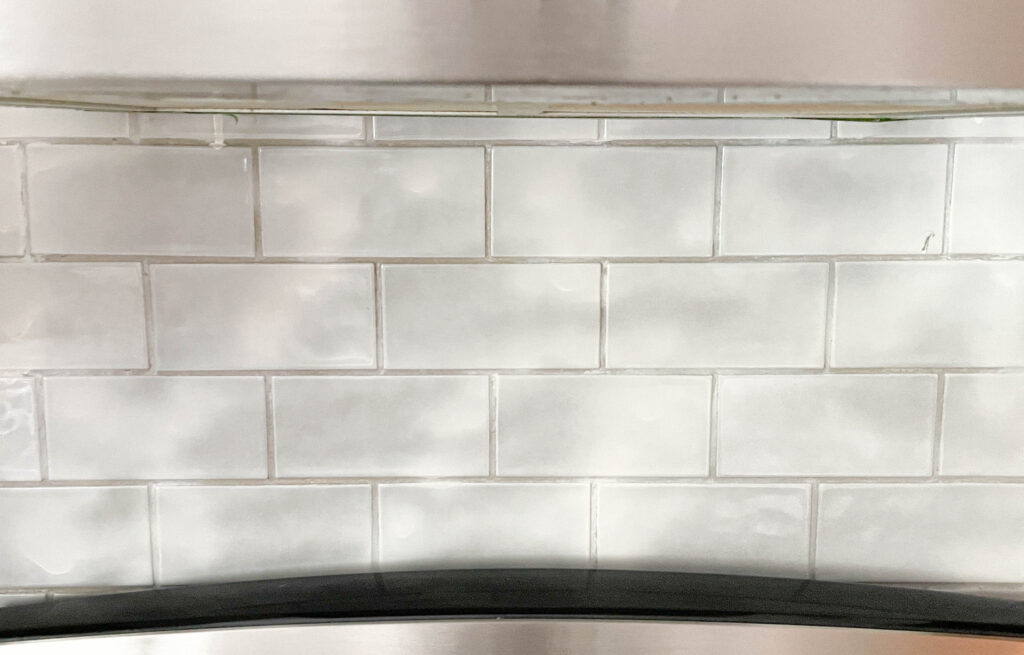
The brush coat went on really well with the paint brush, but like I said I could still see paint strokes and I knew it needed a third coat.
Last coat with Homax Tough as Tile paint using a 1/4″ nap roller
This time I got smart and decided that the brush was creating an uneven finish and it was time to smooth things out. This is probably the most important step in making the tiles look professional!
Homax recommends applying the paint two ways; using a synthetic brush OR a 1/4 nap paint roller.
Since I wasn’t 100% happy with the synthetic brush, I decided to try the nap roller. They say NOT TO USE A FOAM ROLLER.
After immediately using the roller, I knew I should have gone that route for the second coat of paint. The roller created a smooth even finish where the brush did create brush strokes.
Using the brush is key in the grout lines, but the rest of the paint is best applied with the nap roller.
I’ve shared a few pictures below after the third coat was dry.

Eeek it’s starting to look finished!

Quick tip: make sure to remove the painters tape before everything is fully cured. Unless you are a super pro painter, you will have touch ups. It’s better to touch up while the paint isn’t fully dry than wait.
Caulking around the painted tile
After you have completed your touch ups and tile painting process, proceed with caulking around the tile. This is the final step to making your project look finished. I used a ceramic tile caulk product. Make sure to check out my full tutorial (video) to see all the details and more before and after pictures.

Final thoughts
Overall, I’m so pleased with how my painted tile backsplash turned out. Even though I hit a few bumps along the way (don’t all DIY’s?) I feel like the finished product was exactly what I wanted. This product created a budget-friendly way to brighten up this space.
That being said, if I were to use this product again there are a couple things I would do differently:
- Apply the first coat with a synthetic brush making sure to cover the grout lines really well
- Apply the second and third coat with a 1/4″ nap roller to ensure even coverage
The Homax tile spray paint fumes were just too strong. It also left a white dust covering everywhere.
Word to the wise; I would suggest using the spray paint product only if you are working outside or in an area you can section off from the rest of the house.
Even though this space is still unfinished, it’s looking sooo much better!

Thanks for following along. Make sure to check out more paint reviews too.
Lindsey**


