Learn how to create successful Epoxy Resin Pours with my best tips and a handful of previous Epoxy resin pour project.
Over the past six months I’ve attempted four epoxy resin pours. The first two were disastrous, the third was fabulous (I got smart and took a class on how to make epoxy resin art) and the fourth was just plain fun (I finally knew what I was doing and what NOT to do). I figured it was time to share my knowledge of how to create a successful epoxy resin pour and tips on what NOT to do.
Let me show you my mistakes so you don’t make them! Whether you are making river tables or using deep pour epoxy resin, I hope this post will give you a few pointers.
Before I dive into my best epoxy tips and tricks, let’s talk about epoxy products and different brands.
Difference between casting resin and epoxy resin?
When most people talk about epoxy in relation to crafting or coating something, they are speaking of epoxy resin.
When discussing casting resin (for example polyester resin epoxy), most people are referring to a product that is used to make molds, figurines, & jewelry.
That being said, most casting resins can be used for coating applications (as I’ll show you later in the post) and visa versa for coating epoxies.
Below I’ll discuss my favorite resin products. I’ve personally used these products for crafting and they’ve all worked great.
Disclosure; this post contains affiliate links. As an Amazon Associate I earn from qualifying purchases. This disclosure statement refers to the rest of the Amazon links in this post.
Epoxy Resin for Wood Projects
Here are a few of my past Epoxy Resin projects:
Applying resin to wood slices painted with Unicorn Spit
Epoxy Pour Ocean Art of Pallet Wood
Best Epoxy Resin Products
These kits are a great way to get started with epoxy pouring!
Below are my three favorite epoxy resin products for crafting.
- 1:1 Ratio for mixing
- 16 oz kit coats 4 sq feet
- 1 coat equals 60 coats of varnish
- indoor/outdoor use
- 1:1 Ratio for mixing
- Use for coating on any non waxy material
- Self levels well
- 1 coat equals 70 coats of varnish
- Indoor use
- Can be used for coating or casting
- Self leveling
- 1:1 Ratio for mixing
- Can be colored with Alumilite dyes, alcohol inks, or other non-water based colorants
Epoxy Resin Pour Mistakes
Let’s talk about the second time I tried to make an epoxy resin pour (the first time isn’t worth sharing).
It all started with this DIY birch wood fireplace cover. I’m currently in the process of creating an electric fireplace with a DIY hearth so I needed to repurpose the birch wood faux fireplace.
I thought I was going to cover it with epoxy and make a tabletop out of it. Thanks to a few epoxy pour mistakes on my part I ruined it… Womp Womp Womp. Let me show you.

I used this epoxy kit by Envirotex. The instructions seemed easy enough! You mix part A and part B and pour!


Here is where I went wrong. Do you see a lot of air bubbles? After a little research I realized that I didn’t mix long enough AND I didn’t add a seal coat to the wood (I probably needed a few seal coats actually) before pouring the epoxy resin. I mixed part A and part B for about one straight minute before pouring. The instructions called for more. Also, a lot of bubbles will form in your epoxy if the substrate you are using is porous, like these wood pieces. Make sure to research the product and follow the instructions carefully.
The resin needs to mix for a specific period of time to make sure the chemical reaction that makes it cure will be effective. The cure time on each product might be different, so don’t assume you know it! Also, curing time is different than hardening time. Curing resin refers to the process of a liquid resin transforming into a solid state through a chemical reaction. Sometimes this takes days. Even though the curing process might take a while, the hardening process might take minutes which cuts into your working time.
Listen up folks, don’t skimp on mixing. It will ruin your product and won’t cure correctly. This stuff isn’t cheap, so don’t waste it!
Like I said, this was my second attempt at pouring epoxy. I got smart the next time and took a class with a very talented lady names Jess Crow who taught me how to pour epoxy the right way.
Let me show you the pretty faux marble I created with an epoxy pour on wood.

This is where I learned what I did wrong with my two previous pours. If you follow the instructions and you know a few tips before hand, pouring epoxy resin is actually really simple and easy!
After such success with this class project, I decided to venture out on my own and create an epoxy pour ocean art.

This project was a success but I still hit a few snags.
My biggest hang up was that I didn’t work fast enough. I poured the blues first and they poured just fine. When I went to pour the sand color the epoxy had already started to dry. Ugh, make sure to know how quickly it will start to harden before you begin to pour.
Also, be mindful of what you are pouring on because it will stick to anything it touches! When I say stick I mean stay glued permanently. A good work surface is usually made of vinyl, silicone, or plastic.
Tips for successful epoxy pours:
Always seal organic materials like wood before you pour epoxy resin over it;
- If you are covering an organic material like wood or leaves always seal it before pouring the epoxy. Artresin.com shares a very helpful reason why; “Porous, organic materials like wood, leaves, fabric and even some soft, lower quality papers contain air and moisture, which they absorb and emit depending on the climate. These materials will continue to “breathe” … releasing air even after being covered with resin. This is called off-gassing and it results in those pesky bubbles in the resin, sometimes hours after you have poured and torched.”
Follow the proper mix times when mixing parts A and B;
- Always follow the instructions and the amount of mix time for part A and B. SET A TIMER AND DO NOT STOP MIXING UNTIL THE INSTRUCTED TIME IS UP. If you do not mix part A and part B effectively or for enough time, your epoxy won’t cure right. Take it from someone who has made this mistake. It won’t hurt to mix too much but it will hurt to not mix enough (take it from someone who has made this mistake more than once).
Always use the proper protective gear;
- Always protect yourself with at least the minimum amount of protection when pouring epoxy: gloves, eye and clothes protection. A mask is a good idea too. You definitely need a mask when drilling, sanding or grinding epoxy and be aware that the epoxy resin does emit vapors when it’s curing too! I use heavy rubber dishwashing gloves because they cover not only my hands but my forearms too. I also make sure to wear my glasses for eye protection and a mask. Also, always work in a well-ventilated area.
Work quickly once you’ve mixed part A and part B of the epoxy resin;
- Once part A and part B have been mixed you have a limited amount of time before the epoxy hardens and the resin cures. Don’t rush yourself but work diligently. You can see in the video below where I did not work fast enough. The time between mixing part A and B and the epoxy hardening was about 20 minutes.
Use a solid base beneath the medium you are going to pour epoxy over;
- Be mindful of what type of surface you are pouring on. When Epoxy cures it really hardens. Use something underneath to prop your art piece up. Let me show you where I messed up with my last epoxy pour. You can see below where I poured epoxy over a heavy piece of brown paper. Now my issue is how to get the wood pallet off of the brown paper.
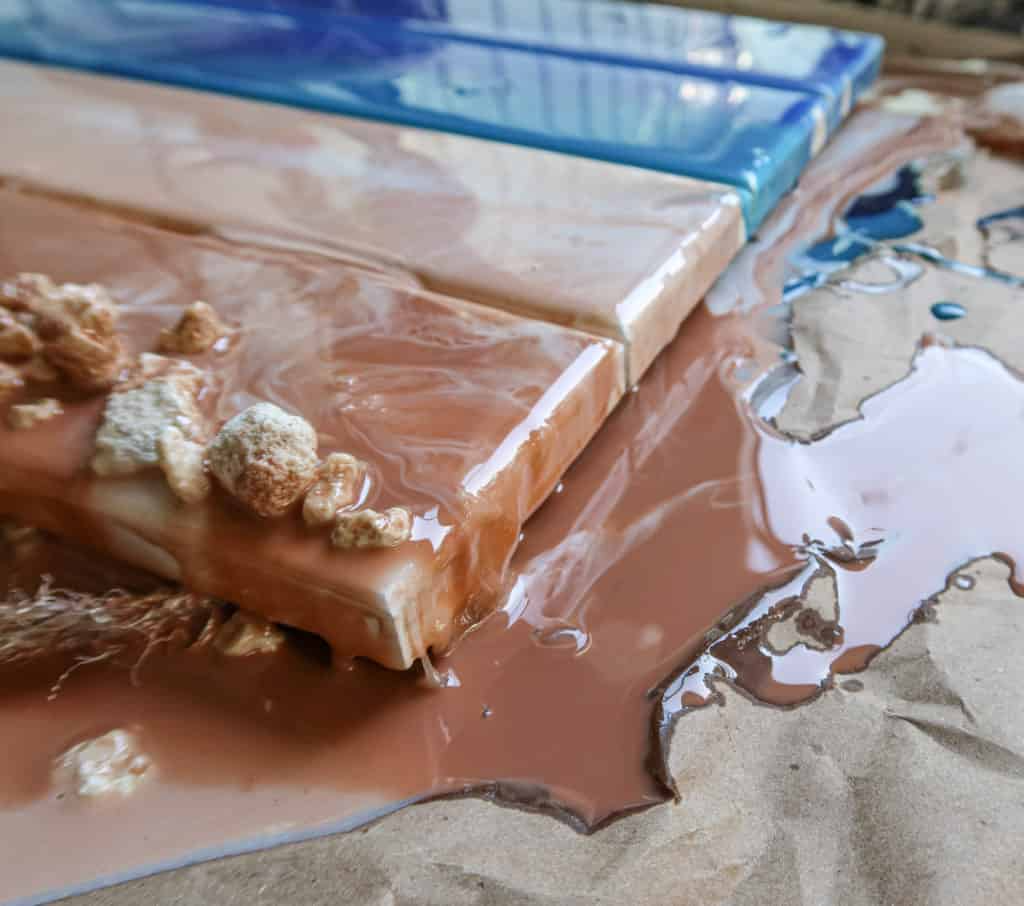
I used a knife to score it.


After I scored through the brown paper and epoxy, it took a little elbow strength to pull it off.
Use a heat gun or blow dryer immediately after pouring the epoxy to move and blend the different colors for a fun design;
- A heat gun is recommended for blending and moving epoxy resin but a hair dryer will work too. Covering the appliance in saran wrap will help prevent the epoxy from transferring from gloves to the appliance. Also, when you use heat, it will sometimes help remove resin bubbles.
Video on how to create ocean art with Epoxy
Now that I’m finally getting the hang of this pouring epoxy hobby, I might have a new favorite craft.

Lindsey**


