Skip to Content

How to Strip Paint and Sealer off Furniture with this Easy Tip

Learn how to strip paint from wood with this easy tip. I’ve also shared my favorite paint stripping product with a desk makeover.

I know I just published a post showing you how I used two household items to refinish wood,  but even after I removed the scratches I still wasn’t happy with the piece of wood furniture.  I tossed around the idea of completely stripping the wood with a chemical stripper like Citristrip, but it made me tired just thinking about it. I know, that might sound silly, because I love to refinish and paint furniture. Just when I was about to give up on the idea of refinishing the desk, I got a tip from a friend on Instagram on how to strip the paint and sealer off of furniture with minimal sanding. Let me tell you friends, this is a game changer.

how to strip the paint and sealer off of furniture

Stripping Paint & Stain from Furniture

I’ve been stripping old paint from furniture for years, and to be honest, it’s not my favorite thing to do. It’s labor intensive and time consuming and takes forever to strip all the layers off of an antique piece of furniture.

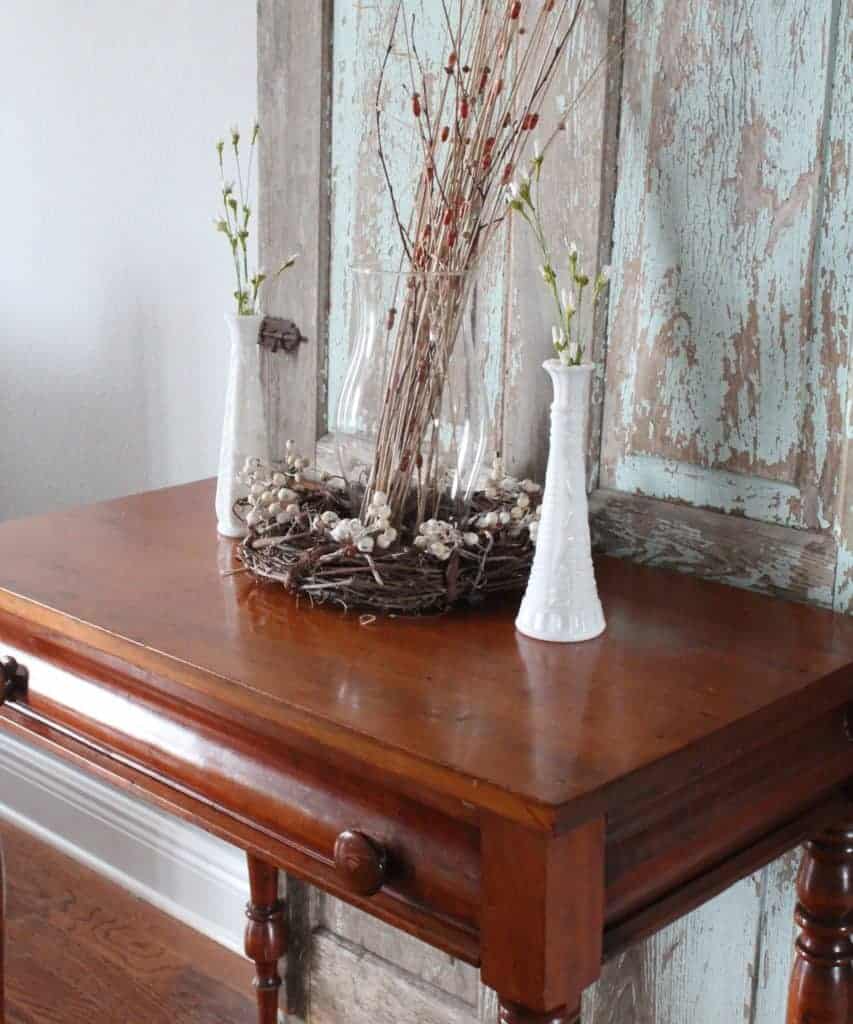
Like I said earlier I was about to give up on my plans to refinish this desk due to, well, my desire for a quick fix. Let me show you what it looked like.

It’s a solid wood antique table with a cherry finish. I love the style of the desk, but I don’t like the old finish. 

the desk before it was stripped

My choices to refinish the desk were simple; paint it (probably with chalk paint), apply stain over the old stain, strip it, or leave it as is. 

Related Stripping Furniture posts:

How to Get Paint off Wood with Citristrip, Vinegar, Heat Gun and Easy-Off

Easy Off Oven Cleaner Turned Furniture Stripper; Lesson Learned

Lately I’ve been finding it hard to paint over solid wood. I love the look of solid wood and I hate to hide solid wood with a paint color that I might not like in the future. I just didn’t want to hassle with stripping furniture.  I made up my mind that I would keep the desk as it is.

Just when I almost gave up my idea of removing the layers of stain and sealer, I got a great tip from a friend on the best way to strip furniture

The easiest way to remove paint from wood furniture

Y’all ready for this? She said to apply Citristrip paint stripper on the desk and then wrap it with plastic wrap and leave it overnight.

Plastic Wrap? Whoa, this was a new one.

I’ve been stripping polyurethane, paint and stain off of furniture for years…

Why had I not heard of this? Either way, I had to give it a try.

Disclosure; this post contains affiliate links. As an Amazon Associate I earn from qualifying purchases. This does not affect the price you pay. This disclosure statement refers to the rest of the Amazon links in this post. See more on my disclosure page.

Best furniture wood stripper I’ve found that makes minimal fumes with LOW VOC’s

My favorite chemical paint stripper is Citristrip. Most paint strippers have harsh chemicals and create super strong fumes. Citristrip does not (this doesn’t mean it’s safe to use without PPE, it just has fewer VOC’s than most).

It comes in a gel form and a spray on (spray can). I’ve used both and they both work well. I would use the spray can for smaller jobs and the gel form for larger ones. 

You can see more of the three best chemical strippers on the market here. In this post I’ve detailed the pros and cons of these three. One thing to note; all three contain harmful chemicals so you need to make sure to use them in a well-ventilated area. Your work area should include an open door somewhere near. 

If you are looking for a NON CHEMICAL paint stripper product, check out this awesome new stripper product that I just did a review on;

P.S. you can strip furniture IN YOUR HOME without worrying about having proper ventilation! Whoa, this has opened a new world of stripping a wood surface or antique furniture. 

Materials to strip the paint and sealer off of furniture:

How to strip paint from wood and stain off wood

  1. Clean the entire wood surfaces with a degreaser product.
  2. spray the entire piece with Citristrip or any other paint stripper. If you are using the spray can, make sure to spray all surfaces including vertical surfaces and flat surfaces. Saturate the wood very well. 
  3. Cover the desk with saran/plastic wrap (there isn’t an easy way to do this, just make sure the plastic wrap is up against all those curves and crevices).
  4. Wait at least a few hours or overnight. It is better to leave it overnight.
  5. Remove the plastic wrap and use a brillo pad or plastic scraper and scrape away the residue. Watch as the layers of paint and or stain wipe away! The steel wool is great to use in detailed areas.
  6. After all the residue is removed (this might take hours), spray a clean brillo pad or heavy paper towel with the after wash or mineral spirits solution and wipe away any extra residue.
  7. Once the residue is gone and the wood piece looks clean, start sanding. My go to sander is an orbital sander. 
  8. Continue sanding until you have reached your desired finish! When it’s done, that wood grain should be very visible!
  9. Apply a sealer to the wood (especially if it get’s a lot of use)

Looking for a good wood sealer? Check out a posts with great product options:

Best Wax for Painted Furniture: Tips and Recommendations

How To Seal Painted Furniture for a High Traffic Surface (this works for raw wood too)

Protect Your Furniture! Best Clear Coat for Wood for a Lasting Finish

How to Tint Polyurethane and Add Color to a Top Coat like Polycrylic (Just in case you want to tint your sealer)

Great tips on Stripping wood:

  • For the hard to reach spots like the nooks and crannies of the legs, use a liquid sander or deglosser.
  • Is the furniture piece older than 1978, always make sure to test for lead-based paint first. There are easy tests you can buy online to test for this. Lead paint is no joke, don’t skip this step!
  • If you want to keep the “natural wood look” without a high shine sealer product, wax is a good option. 
  • I used the electric sander for the top of the wood and some of the flat areas. 
  • For the legs and the drawers, this is where the liquid sander came in handy. I used a little bit on the legs of the table below to help with the hard to sand places. 

Here are some images from the progress:

wrapping the furniture with saran wrap after applying the wood stripper

I sprayed it down with Citristrip and covered it with saran wrap.

After I finished stripping most of polyurethane and stain off the wood, I applied the after wash.  You can use “after wash” or mineral spirits. I think they both do practically the same thing.

sanding the wood after stripping the paint and stain off

I used the electric sander for the top of the wood and some of the flat areas.

For the legs and the drawers, this is where the liquid sandpaper came in handy. I used a little bit on the legs of the table below to help with the hard to sand places. 

Letting the paint stripper sit overnight with the plastic wrap made it easy to remove the extra stain without much effort.

how to strip the paint and sealer off of furniture
stripping furniture

After most of the sanding, this is a little before and after of what the desk looked like.

Before and after stripping the wood furniture

I picked up some new hardware from Ace’s Hardware. I wanted to keep with the “vintage antique” vibe.

I was happy with the transformation so far, but the red tones on the drawer and the top still bothered me.

I tried using a dark wax, a “weathered” stain, and a clear furniture wax with no luck! All these products still brought out the red tones.

After doing a little research, I decided to try to bleach the wood. This is new, I had never done this before, but I’m so glad I did.

How to bleach wood:

FYI: I used regular household bleach because I didn’t have anything else. This isn’t the best option, but it’s all I had at the time. I’ve detailed how to bleach wood in this post on staining wood with household items.

If you are planning to bleach a piece of wood or furniture I would highly suggest buying wood bleach. You can see a great product HERE.

using bleach to strip the wood

Above is the drawer before I used the bleach.

bleaching wood furniture

I dabbed a little bleach on a heavy paper towel and wiped it all over the wood on the desk. I let it dry and then repeated this process about 5 times.

After wood was bleached

You can see where the bleach has already dried on the wood, and where it is still wet.

After bleaching the areas of the wood that still had “red tones,” I sanded a little more, and then I was almost done!

Lastly, I added a sealer to the top and sides of the desk.

For those of you wanting to know how I sealed the raw wood, check out my post on how to seal furniture for high traffic. I’ve shared my favorite furniture and wood sealer with a list of other sealers too.

after the wood furniture had been stripped
how to strip the paint and sealer off of furniture
stripped wooden desk with bare wood
stripped wood furniture with bare wood
Stripped wood furniture- top view

Well there you have it; a total furniture transformation.

I love the raw wood look and I’m so pleased with how well the saran wrap trick helped me strip the paint off of this old desk.

Thanks for stopping by and I hope you’ve been inspired to strip a piece of furniture the easy way!

How to Strip furniture with this Easy Tip

stripping furniture the easy way

Learn how to strip the paint and sealer off of wood furniture with this easy tip that reduces the time it takes. This little furniture stripping tip is a game changer.

Prep Time 30 minutes
Active Time 3 hours
Total Time 3 hours 30 minutes
Difficulty Medium
Estimated Cost 30 dollars

Materials

  • gloves
  • plastic drop cloth
  • saran wrap (I still couldn't believe I would be using this)
  • paint stripper
  • paint scraper
  • brillo pad or steel wool (a couple of these)
  • sand paper
  • electric sander (not necessary, but helpful)
  • paper towels
  • Mineral spirits - to clean up paint stripper
  • Klean Strip Liquid Deglosser

Tools

  • Paint Scraper
  • Sander

Instructions

  1. Spray the desk with Citristrip or any other paint stripper. Make sure the desk is clean before spraying it.
  2. Cover the desk with saran wrap (there isn't an easy way to do this, just make sure the saran wrap is up against all those curves and crevices)
  3. Wait at least a few hours or overnight.
  4. Remove the saran wrap and use your brillo pad or scraper and scrape away the residue
  5. After all the residue is removed, spray a clean brillo pad or heavy paper towel with the after wash or mineral spirits and wipe away any extra residue.
  6. Start sanding
  7. For the hard to reach spots like the nooks and crannies of the legs, use a liquid sander or deglosser.
  8. Continue sanding until you have reached your desired finish
  9. Apply a sealer to your wood piece

If you enjoyed this post I would love for you to pin the image below!

how to strip furniture with Citristrip
How to Strip furniture and wood

Lindsey**

Leave a comment

Your email address will not be published. Required fields are marked *


  1. Michelle says:

    Does the area where you are stripping the door/furniture have to be a certain temperature? I bought a vintage door for my pantry and need to strip I don’t know how many layers of paint off it, but it’s now winter and we don’t have heat in the garage other than a little heat dish I could take out there.

    • I know it’s best to use this product strip a surface in between 65 to 85 deg F. Even though it works best in these temps that doesn’t mean you can’t use it in colder weather, it just won’t work as well.

  2. Karen says:

    Your handles don’t line up. How to fix?

  3. Lori says:

    I love the transformation! Thanks for the great tips!

  4. Christen says:

    If you are wanting to strip the stain off a piece of furniture and then paint it a different color, would you still use the mineral spirits to clean up the paint stripper?

  5. Mona says:

    I like some advices, not the final product. The raw wood doesn’t look better, until you are into a rustic / primitive look. Classic look is forever.

  6. Kathleen says:

    The saran wrapping is a game changer!!!!

  7. Jackie says:

    This is such a cool technique! We are updating our kitchen and I would love to do this with our table. We are doing some kitchen cabinet refinishing next week so maybe after that! Thanks for sharing!!!

  8. Lori says:

    We’re renovating a house built in then 90’s. It has these very nice solid maple 6 panel doors but they’re that orange maple stain. I tried everything to remove the top coat but it’s stubborn, so since I don’t know what that top coat is I tried removers for every type it could be, but it was applied at the factory and whatever they use is like iron. I have an entire house full of these doors; my next step is to have them dipped unless you have a suggestion, and my fingers are crossed you do. Thank you for all your wonderful ideas.

  9. Patti Downs says:

    If I wanted to use dark wax on some carved detail on a piece I bleached, would I do that before or after sealing?

  10. Kathy says:

    I used the stripper/plastic wrap method years ago on a dresser I picked up for $10 at a garage sale. The finish was very strange….not laminate, but some kind of rubbery substance that gunked up my sander in minutes. I was thrilled when it all peeled off the next day to the bare wood. I painted it light gray, added moldings, antique glaze, and glass knobs….I still have it. It’s one of my all time favorites flips.

  11. Sara says:

    When I was in high school Home Economics class or teach actually taught us how to refinish furniture. To do this she brought in an antique china hutch with the curved glass front and had us refinish it. After we removed all the old finish we used Clorox on it to bleach out all the old stain. I wish I had a picture of how it turned out!! It was so beautiful!! She was a remarkable teacher and taught us all kinds of useful stuff in addition to cooking, sewing and making a household budget. She taught us how to draw house plans and when we built our home I drafted my own house plans.

  12. Munter says:

    How do I clean my brushes after applying stripper and I am finished for the day? or do I use foam brushes and throw it away?
    Thank you, Emily

    • Use mineral spirits or turpentine to clean them with. If you want a disposable option – yes a foam brush will work. My best suggestion is to not dip the brushes back in the paint stripper as to not contaminate it. Pour the stripper on the surface and then use a foam brush to even it out.

  13. This is beautiful! What grit of sandpaper did you use

    it was great to see us

  14. Tara says:

    Hey hey! Even easier than saran wrap are garbage bags. Simply cut the bags down the seams and open them up. Wrap and then let it sit. I like to let it sit for 12 hours. Doesnt require that long, but the heat trapped inside keeps the stripper wet and easy to scrape off. I like to use a plastic scraper. Works wonders and doesn’t scratch the wood at all.

    Happy Refinishing 😍

  15. Rachel says:

    Love this information! Thank you for sharing! I wondered how you feel about using heat guns for stripping furniture? I painted my kitchen cabinets about 5 years ago, and I wanted to change the color on the bottom ones to something darker. I heard some positive reviews about heat guns, but I wanted to know your opinion. Thanks for the wonderful post!

    • I’ve never used a heat gun to strip anything so I can’t tell you first hand what I think. I think it looks pretty tedious. It seems like it would work ok on a flat surface but I wonder about curves like spindles. Since cabinets are mainly flat it might be a good option!

      • Angie says:

        I tried this process for the first time. After a couple of hours I pulled back the saranwrap and checked it. It was kind of dried on there so I freaked and took it all off and started removing. I’m wondering if that was normal and should of waited or did I do something wrong?

  16. Lauren says:

    Is there a trick with the deglosser? I’ve tried that for my kitchen cabinets and it didn’t seem to do anything. Love the final result of the table!!

  17. It’s a shame you don’t have a donate button! I’d most certainly donate to this excellent blog! I suppose for now i’ll settle for book-marking and adding your RSS feed to my Google account. I look forward to new updates and will talk about this blog with my Facebook group. Talk soon

  18. jai jangir says:

    How often do you have to do this to keep the wood looking good? Thanks for a great idea!

  19. Christine says:

    So..
    Why are you using unnecessary chemicals to neutralize Citristrip, when you can do it with water?
    Even the website (now) says to neutralize with water, because chemicals can cause stain to reactivate back into the wood. My 1st piece did –in a nice, magenta color. Yup. Which I think contributed to the blurb on the website. (I have pictures on my tiny blog.)

    Anyway, water and a good scrubbie will remove everything left. Then I turn my pieces on their side, so the grain is vertical to the ground. Often I just spray the garden hose on it to rinse, but then run my (plastic) scraper along the grain to press out excess moisture. Yes, water on wood. Briefly.

    I also find a nice 2nd coat of Citristrip will such the remaining stain out of the wood. I’ve returned 15 antique doors to their raw wood state. They are unbelievable.

    You also don’t have to leave it on over night. I would actually be careful of veneered pieces, because Citristrip is wet and can cause the veneer to lift. I’d check it in 3-4 hours, which is often enough time to lift 6-7 layers of paint.
    Another reason I run that plastic scraper down along the grain when I’m done.

    You don’t have to worry about getting all the Citristrip off, either. If it dries on there, just take a 220 grit and smooth it off when you smooth the grain . That’s really all the sanding needed after this method, anyway.

    A final thought. Why waste Saran wrap when you can cut open some of those millions of plastic grocery bags and press them into the Citristrip? Makes me feel less wasteful for using plastic when I use them for something like this.

    Your demonstration piece turned out beautifully. It’s wonderful what can be done nowadays, which won’t eat your flesh, destroy your lungs, yet yield incredibly revived furniture, isn’t it?

    • Hi Christine, You’ve made a lot of good insight here! I only left the citristrip overnight because it was solid wood and had LOTS of layers of stain and sealers. I definitely would not do that with veneer. As far as using the after wash to get rid of excess citristrip- I’ve found it removes the “gunk” much easier than water. It is toxic and smells, so water is better for that! Every piece of furniture is different and requires a little different technique, right? Thanks for stopping by and leaving some insight!

  20. Katie Morris says:

    What a great idea! I’m going to try this on my kitchen table and chairs; quick question when u say you sprayed the Citristrip, what did you use to spray it, I Tried a spray bottle and because it is a gel, unfortunately it’s too thick and doesn’t come out … please help 🙂

    Thanks!

  21. TheTimberGuy says:

    nice blog, very information to how to fix furniture easily.

  22. Alicia Moore says:

    Very interesting process. Sounds like it works great. Oxalic acid or wood bleach are best for bleaching. The Citrastrip in a spray sounds great, never used the spray version. Another idea is shrink wrap on a hand held roll because it comes in a small with like 3″ and I’ve used it up to 3′ for wrapping and it might be a tad thicker than saran. Thanks for the tips.

    • Christine says:

      I agree with Oxalic acid, which is excellent for water stains.
      I splurged and picked up some of the two-part bleachs, which remove pretty much everything.
      Citristrip is a waste of money, really. You don’t need an even coat, just press the plastic into it so it stays against the wood. You get more for your money with a paint brush.

      Don’t forget it also removes old dried paint from brushes…

    • Thanks for stopping by! I’ll have to try oxalic acid!

  23. Brittany says:

    Hi,

    I’m just wondering what you used to seal your project? I love the natural wood look!

  24. karen says:

    I strip furniture often, and discovered wood bleach early on when to my horror stain color did not always look the way I thought it would. I use Zinsser Wood Bleach. So I sometimes will stain a “mistake” then put the wood bleach on, and the result is always beautiful. I will try regular household bleach on a piece of wood to practice.

  25. Kellie says:

    Hi Lindsey! The table is beautiful!

    I have not had much experience with repurposing wood furniture but just found a beautiful oak kitchen table that I’d like to strip down so it has an unfinished cottage look. After I strip the stain and sand, like you’ve shown above, is there anything you’d recommend to seal that wood so it would be easy to wipe off kid’s markers or food spills? I have a three year old daughter that loves to do crafts.. 😉

  26. […] After applying paint stripper to any surface, cover with saran wrap or a large bag. See more details on my post all about stripping furniture the easy way! […]

  27. Today when I read the Blog that you have posted and it was amazing.
    The contents were useful and knowledgable.
    Thank you for Sharing this, for sure it will help many others too.

  28. […] How to Strip Furniture the easy way – vintage desk […]

  29. […] I won’t go into too many details on how I stripped the finish off of this coffee table because this post is mainly about my lime wash finish. If you are interested in seeing more about how I strip most of my furniture flips (and a handy little hack), check out my post HERE. […]

  30. Tani says:

    Hi Lindsey – I just purchased 2 beautiful oak dressers that the seller painted white. She was going for the
    Shabby look, but they look awful. Was going to strip them and then saw your idea! Do you think it would work as well on PAINT. She also painted the drawer pulls instead of removing them! Yikes.

    • Hi Tani,
      this technique works BETTER on paint than stain actually! I’m about to strip a piece of furniture that had a “shabby white” finish too. I hate when people paint over pretty wood! Good luck with your project!

  31. […] If you liked the vintage desk under the botanical prints, you can see how I stripped the wood on this beauty HERE.  […]

  32. […] draws is that it does not require a primer because it will stick to almost any wood finish. In the furniture refinishing business this was huge. You could paint over polyurethane, wax, even glue and it would stick! Gone were the […]

  33. […] In order to strip the vintage desk, I used an easy technique where I cover the desk in paint stripper and saran wrap. Yep, I really meant saran wrap. If you want to see more details on this technique click HERE. […]

  34. […] The Easy Way to Strip Furniture of Polyurethane, Paint, and Stain with Minimal Sanding @ repurpose and upcycle […]

  35. Genevieve Ferratusco says:

    In the process of doing this to a plant side table and a beautiful dresser. Yes I know (crazy) two projects at once. So far so good, I didn’t let the gel stay on long enough for the legs of the side table so I’m letting the dresser go a full 24 hours. Will tag you in photos!!

  36. Kim Six says:

    I love this tutorial. so much great information. I am even featuring it this week at Creativity Unleashed. Thanks so much for linking up! http://www.thekimsixfix.com/2017/09/creativity-unleashed-189-crates-pallet.html

  37. Judy says:

    That came out beautiful. I will be featuring this tonight at my Sizzle into Summer party. Please stop by and pick up an I’ve Been Featured button. Thanks so much. http://diybydesign.blogspot.com

  38. What a great article chockful of tips, for sure pinning it to my furniture DIY board! Thanks for sharing your project at #fridaysfurnturefix Lindsey! Gotta try that bleach trick!

  39. […] The Easy Way to Strip Furniture of Polyurethane, Paint, and Stain with Minimal Sanding from Repurpose and Upcycle. […]

  40. Jen says:

    You had me at easy! This is so good 🙂 #happynowlinkup

  41. Sandra Garth says:

    I’ve never stripped furniture before but I’ve wanted to. When I do these tips are going to come in very handy. Thank you for sharing with us at Celebrate Your Story, and have a great weekend.

  42. acraftymix says:

    Oooo eeM Gee Lindsey, she turned out so gorgeous. I’m so glad you decided to strip instead of paint. I think sometimes we go a little overboard with the whole paint thing. Pinned to my Hacks&Revamps boards, because I’m so going to try this

  43. Theresa says:

    Love, love, love this post. Your project. The tips + end results. ???? Thanks for sharing this at the Inspiration Spotlight party. Pinned & sharing.

  44. Michele says:

    I love the Saran wrap trick. It makes sense, that it will just sit and cook and give the stripping compound time to work. I will try this! Thanks for sharing with PitStop.

  45. Anonymous says:

    Love it!! How did you seal it?

    • I struggled to figure out a way to seal it without bringing the red tones out. All i’ve done so far is seal the top of it with a matte polyacrylic. It did bring out a little bit of the red, so I’m still trying to decide if I want to use it on the rest of the piece. If you have any suggestions on another product I’m all ears.

      • Jo says:

        You will never completely get rid of the red tone but by incorporating more brown into the wood with a darker stain you would be able to stain it then seal it with a tung oil which would bring ou the luster of the wood. Right now it looks unfinished.

        • Lana says:

          Found you as I was scanning pinterest and I am so glad. I’m just learning about painting and stripping furniture and you instructions and videos are awesome. I have read Alito and I mean ALOT of info on this and you have my vote for easiest to understand. Thanks for all your effort and support for beginners like me! I just keep reading your stuff and saying….”who knew”…….. you do that’s who!! Thanks again.

      • Suzanne Cumbie says:

        What about Annie Sloan White Wax? It is very subtle and has to “sit” a while before wiping back or it does not leave a white residue. You might even like the look if a tiny bit fell into the crevices 🙂

  46. I am a big fan of flipping furniture and I love the idea of doing this – the finished table looks fab! 🙂

  47. This looks like a much easier way than all the scraping! Thanks for sharing at The Blogger’s Pit Stop! Roseann from http://www.thisautoimmunelife.com

  48. K.Rupp says:

    WOW I love this. I did see your post on instagram and I was wondering what you did. Thank goodness I found your post at the handmade hangout party. By the time I went back on instagram, I couldn’t find it again. ha. Thanks so much for your post! I love new refinishing techniques:)

  49. Leslie says:

    What an awesome tip! Definitely saving to my DIY Tips & Tricks boards…because I KNOW I’ll need this someday (I’ve got an old jewelry chest that could use a little love) Thanks so much for sharing at the #happynowlinkup!

  50. You do some amazing work. I found you from the link party on Organize 31. I am going to subscribe to your blog so I can keep this handy. I am about to build a house and need some great ideas that me and my wife can do to decorate it. I also followed all your social media profiles. Again really love your pictures and work. Your blog looks amazing. Big like from me!

    • Wow thank you so much! Your kindness means so much. Take care and have a great day!

      • Linda Ward says:

        Thats a great idea! I may also say imaginative.

      • Mary M says:

        We have a lot of mahogany and cherry finishes on our furniture, most of which was given to us by parents and grandparents. We are getting ready to rehab an 1870’s farmhouse and want to incorporate some different finishes on the furniture we own. This gives me dozens of ideas. Thanks!!

  51. jenbl96 says:

    The table looks great! What exactly did bleaching do? Remove the red tones?

  52. Lin says:

    Your desk really looks great! I am so happy to have found this post as I just purchased a vintage bankers chair and want to strip it and have it look like the finish on your desk. I have never stripped furniture before, only painted, so I know this will save me time and effort. Thank you so very much!!!

    • you are very welcome and I sure hope it works! I’ve stripped a lot of furniture and every piece is different as far as how long and how much effort it takes the remove the layers. Good luck!

  53. JESS44903 says:

    This turned out so great!

    I would love for you to share this with my Facebook Group for recipes, crafts, tips, and tricks: https://www.facebook.com/groups/pluckyrecipescraftstips/

    Thanks for joining Cooking and Crafting with J & J!

  54. Amber says:

    Love how it turned out! Thanks for sharing!

  55. […] shares The Easy Way to Strip furniture with minimal sanding. You will love her […]

  56. Wow that is so effective! I’ll have to give it a try! Found you at the Mad Skills Link Party <3

  57. Marie says:

    Beautiful job! I will try this on one of my table at home.

  58. I’m excited and I’m going to try this with a couple of pieces of furniture I have that have an orangey stain. Thank you so much! Patti

  59. Jauquetta says:

    I’ve used the cling film w CitriStrip and it works great! Haven’t tried the other stripper yet. I also bleached a chair but I used oxalic acis crystals, never just regular bleach. Good idea. The crystals sure burn if you get them on your skin, at least it did for me. The table came out great, such pretty lines. See why you wanted to keep it straight wood. Nice work.

  60. Lindy says:

    This is a fantastic post. I have never heard of bleaching wood. So cool. You did a great job.

Skip to Instructions