Skip to Content

How to Make Oversized Portraits on the Cheap with Engineered Prints

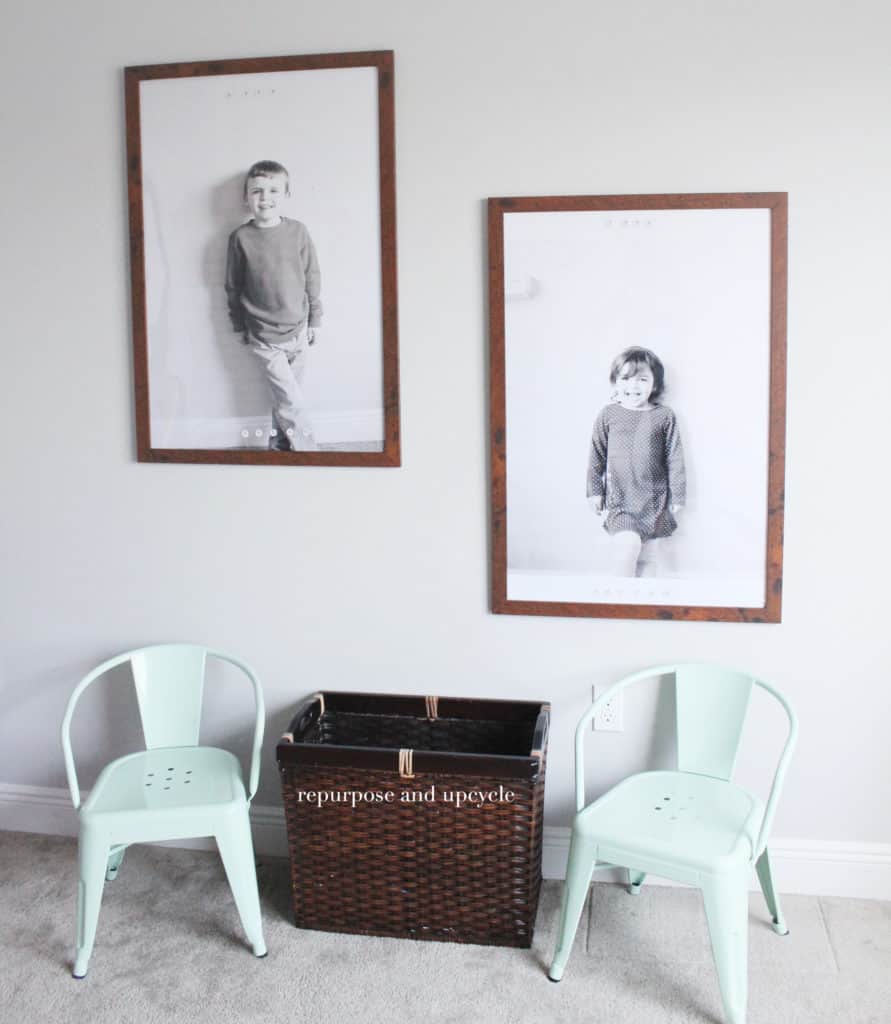
Sometimes I feel like a bad mom. I’m going to tell you a secret I’m a little ashamed of; I haven’t taken “professional” family photos in over two years.  gasp. I know, I’m a bad mom. I’ve always been amazed at the moms who have professional photo shoots every few months with their kids in the perfect outfits and their hair perfectly brushed.  Meanwhile, I’m over here struggling to get my kids to school on time. #imahotmess. But, every now and then I surprise myself.  Like this ingenious idea I had to make my own DIY portraits with engineered prints. 

DIY portraits with engineered prints

Let me first say something; I did use a high dollar camera although that is not necessary. Smart phones have the ability to take fantastic pictures,  so don’t think that you can’t re-create these oversize portraits without one.

My desire to create these engineered portraits evolved out of a desire to document my kids in the natural.

You know what  I mean?  No fuss, no frills, no perfect clothes…

Just my kids, as they are, with their personalities shining through.

With that being said, you will understand why they aren’t dressed their best and their hair isn’t perfectly brush (Lord knows my daughter won’t let me touch her hair anyway).

Disclosure; this post contains affiliate links. As an Amazon Associate I earn from qualifying purchases. This does not affect the price you pay. This disclosure statement refers to the rest of the Amazon links in this post. See more on my disclosure page.

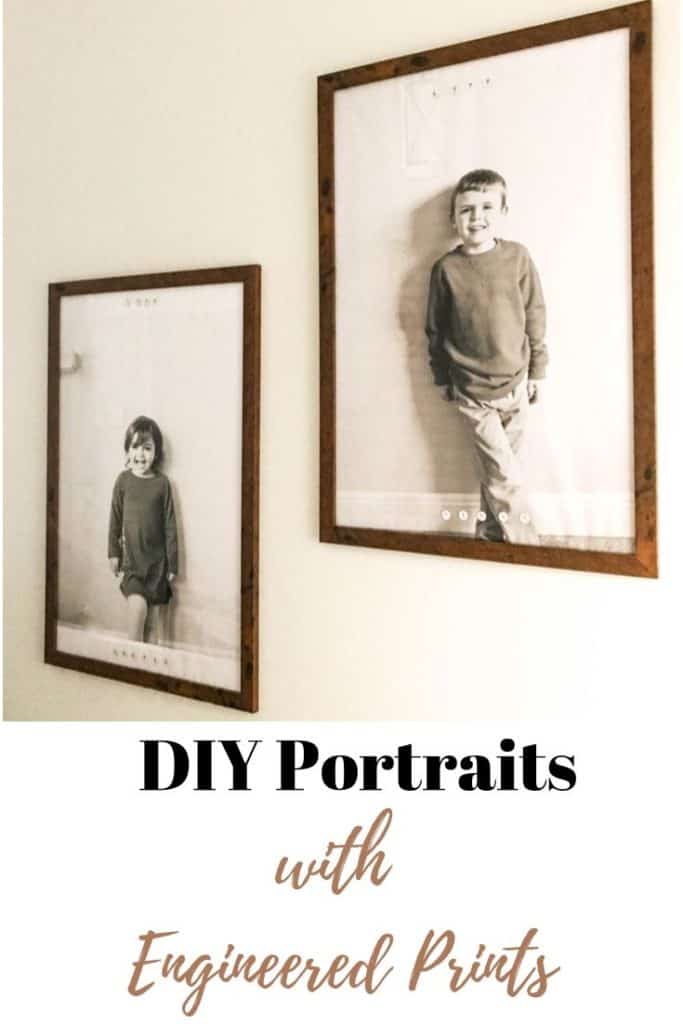
How to create DIY portraits with engineered prints

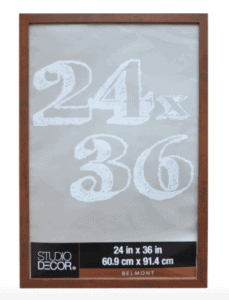
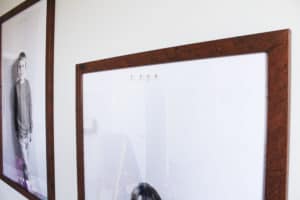
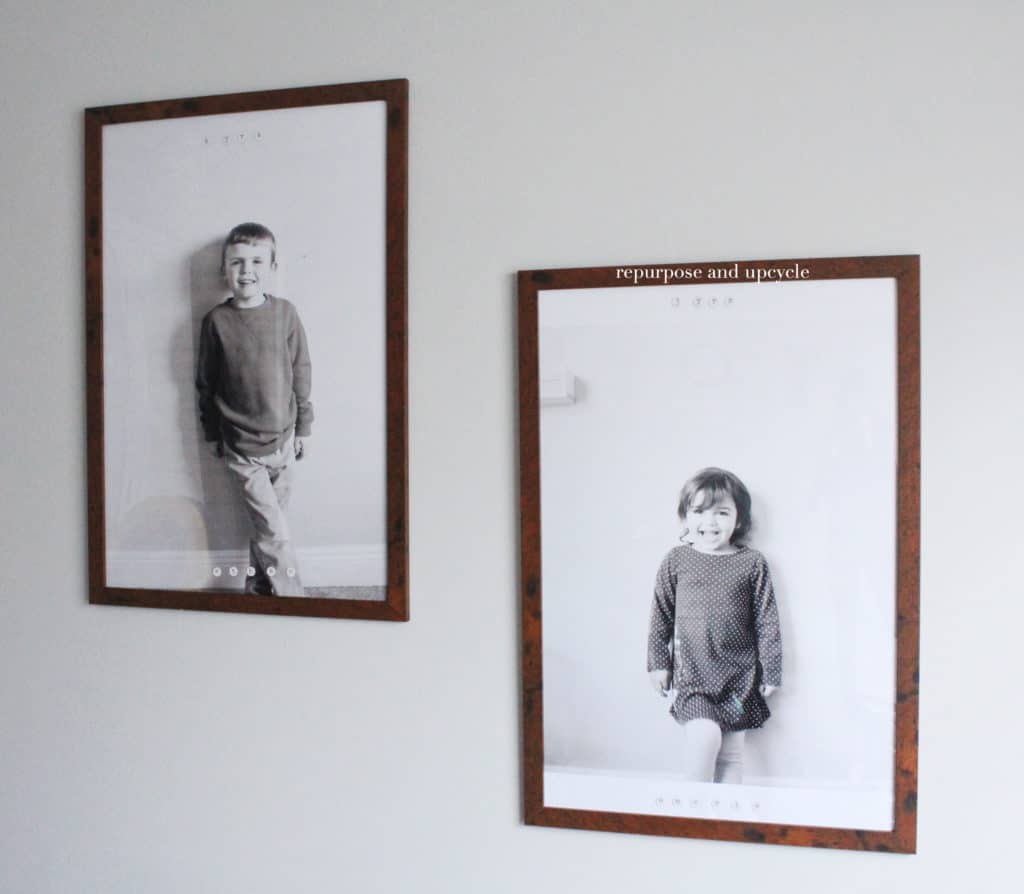
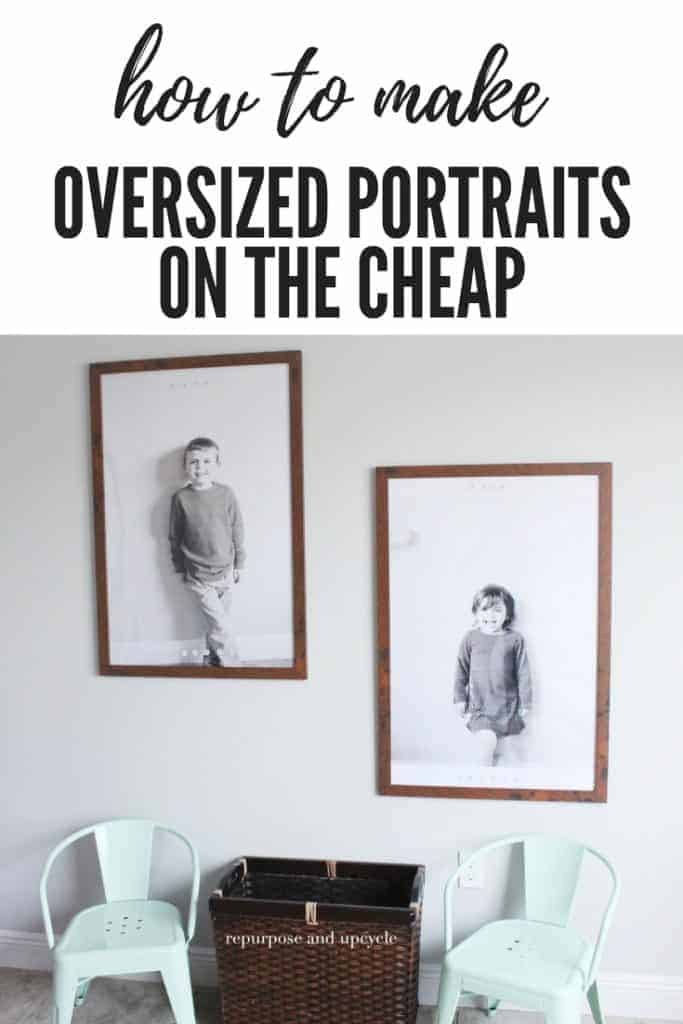
I found a great deal on oversized picture frames from Michaels. For $19.99 you can get a 24″ by 36″ picture frame. This, in my opinion, was super cheap for a frame that size!

picture frame 24 by 36

After I ordered the frames, it was time for the “photo” session. I don’t know about you, but any time I try to take pics with my kids it is a disaster.

Like I said earlier, I did use a nice camera, but your camera phone should work just as well since we aren’t going to be printing these with a high end printer or using high end paper.

An engineered print is actually that; a print of an engineered drawing. Since engineered prints are cheap (like $3.50 for a 24 by 36) and meant for engineered drawings not photos, it’s much better to print them out in black and white.

Because DIY engineered prints are not made for photo quality, you need to edit your oversized pictures or portraits a few ways.

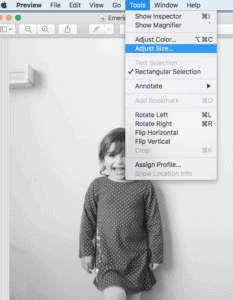
After you’ve transferred the images to your computer, go to tools and adjust the color.

Another note, you don’t need a fancy program to do this. You can edit the photo file, or if you prefer to use an editing program, there are free ones. I use Polarr Photo Editor Light and I love it (it’s free!).

How to edit your DIY engineered prints

editing photos

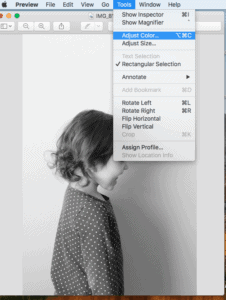
I’m on a Mac, so if you use a PC this might look a little different, although I wouldn’t think too much.

When you see the color box, adjust the saturation all the way until the picture looks black and white.

editing photos

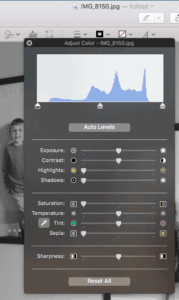
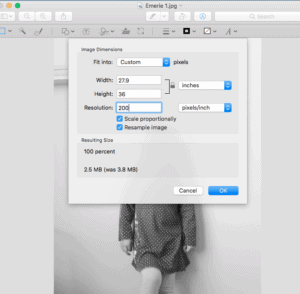
Next adjust the size. If you don’t do this, your large family print will be super grainy.

I adjusted my photos to 200, and that seems to work well with the engineered print.

editing DIY engineered prints

Another big thing I screwed up on……..

Make sure you adjust the size of the photo to 24 by 36. I adjusted the width to 24 and kept the photo to scale which made the length longer than 36.” I assumed this would be ok and the extra just wouldn’t print.

To my dismay,  the lady at Office Depot said it wouldn’t print the right size if the length was over 36″? Maybe it was just the sales lady I spoke to, but don’t make the same mistake I did. Adjust the size correctly BEFORE you take the file to a printing store.

Another note; I’ve seen many other bloggers create their oversized photos with engineered prints for about 3 dollars. The lady at Office Depot did confirm that a 24″ by 36″ engineered print was $3.50.  BUT she highly suggested using a higher grade of paper (because a photo uses more ink and might tear the cheap engineered print paper) and this raised to price to $19 per print. So that is what I chose.

My total with the frames for two engineered prints was about $60. I’m still pleased with that!

The last thing I did was add letter stickers with my kids name’s and age.

DIY portraits with engineered prints

Budget friendly DIY oversized family portraits

DIY portraits with engineered prints

I hope you enjoyed this post and found it useful. I would love for you to save the image below to Pinterest!

how to make oversized pictures or portraits with engineered prints
DIY portraits with engineered prints

I bet if you enjoyed this post you  might want to see my kids toy storage table I created in less than a day.

Thanks for stopping by friends!

Lindsey**

Leave a comment

Your email address will not be published. Required fields are marked *


  1. Joy Gwilliam says:

    Believe me when I say that those mothers have the pictures taken every 2 months they have help!!!! I like yours so much better, because they’re real. It is nice to get portraits once in a while but I much prefer the natural. YOU ARE A GOOD MOM. Mom’s and Teacher’s have the hardest jobs of anybody and everybody. I can say this totally without prejudice as I’m not a mom. My hat is off to all you mothers out there. One day your children will run this country! Sincerely, Joy

  2. […] noodling pictures that I would like to do this […]

  3. I like these so much better than “posed” pictures and they look fantastic! Thanks for sharing this with us at the Homestead Blog Hop!

  4. […] How To Make Oversized Pictures or Portraits on the Cheap by Repurpose & Upcycle […]

  5. […] Repurpose and Upcycle: How to Make Oversized Pictures or Portraits on the Cheap […]

  6. Love these! What a great option for pics of your kids. You know, I never did the professional photos of my kids much–when they were little, we just didn’t have the money for it. And honestly I tend to prefer candid shots like these.

    Thank you so much for joining the Grace at Home party at Imparting Grace. I’m featuring you this week!

  7. P~ says:

    What a great idea! Thanks so much for joining us by posting to Friday Frenzy! P~

  8. A great idea, they look great and really good price too. Thank you for joining us at #SharingtheblogLove

  9. Emily says:

    These looks really effective. Thanks for joining in with #ThatFridayLinky

  10. What a brilliant idea, they look fantastic and I think that is a really reasonable price! I much prefer candid photos of the kids. Thanks for linking up to the #bigpinklink this week.

  11. Nige says:

    I love these brilliant, I’m not a fan professional photos so over priced fab post Thank you for linking to #Thatfridaylinky please come back next week

  12. Lorin Small says:

    Fantastic idea I’m definitely pinning this one!

  13. Julie says:

    Beautiful photos! Pinned for inspiration — need to fill that blank spot on the dining room wall!

  14. Naaaaa, you’re not a bad mom Lindsey, you’re just darn awesome. Love the huge portraits of the kids, they make such a WOW statement and it’s so refreshing seeing kids being natural, the way they are everyday when they’re being real.

  15. I just hopped by from Homestead Blog Hop to check out your oversized picture solutions and I shared this wonderful post. These are such useful and inspiring ideas.

  16. Emma says:

    We’ve only had one set of professional photos done and that’s because we won them and ended up buying more (fell right into that one). Will definitely give this a go!

  17. These came out beautiful. I’ve printed on engineer paper before for chalkboard printables…never photos. Thanks for the tip to upgrade the paper. Worth it for these beauties.

  18. Love the look! I have five kids and a long empty wall in my living room…thanks for sharing!

  19. Kayleigh says:

    Lovely photos. We don’t really have anything like this but I do have photo albums full of our holidays which I love looking back over. #sharingthebloglove

  20. This is such a good idea and I will definitely be trying it #BloggerClubUK

  21. Chloe Day says:

    Hi, I love these photos and how you have created them. I think that I shall pin this to have a little try #BloggerClubUK

  22. Tammymum says:

    These are really great! They look fab and I’d definitely like some in my house. I have some wonderful photos of my children I could use. I’ll certianky give this a go. Thanks for joining us at #familyfun

  23. Julie Downes says:

    These photos look great, such a great idea. #familyfun

  24. Carol says:

    Great post – pinned and shared. Visiting from Happy Now Linky

  25. Teresa says:

    This is a great idea, thank you for the tips. Other than the occasional professional photos we’ve taken as a family in the past, the largest photos we have at home are those I can run through our home printer, so they’re never oversized.
    Thank you for joining The Really Crafty Link Party. Pinned.

  26. Rhiana says:

    Such a beautiful idea! I’ve shared the link to your post on my Facebook page. So awesome!

  27. Pinning! Your portraits look amazing. These would make lovely gifts for Grandparents and other family members as well. Thank you for sharing this creative, frugal project with us at the Hearth and Soul Link Party, Lindsey.

  28. Trudy says:

    I love this so much! I like how they aren’t “professional” photos. It is so much more personable when your kids look the same as they always do! Great idea!!

  29. Pen says:

    This is a lovely idea. I love the photos. They add a really personal touch to a white wall. Pen x #FamilyFun

  30. Dean says:

    Wow- thank you so much for sharing your tip with us at MMBH!! Pinning this to our board. 🙂

    Also, you’re not a bad mom. If you’re a bad mom then I’m a monster, I have had a whole other kid since the last time we took professional photos. Also, that kiddo is now 9. 😀
    I take my own photos. 🙂

  31. Catie says:

    Thanks so much for sharing. I now know where I went wrong with my last oversized print. I need to adjust the pixel size. Thank you 🌸 Thank you 🌸 Thank you 🌸 Dropping by from #FamilyFun

  32. I’m so glad this little project is an inspiration! Thanks for stopping by Susan.

  33. Super cute! I love black and white pictures. I made something similar for my wedding. #bigpinlink

  34. Hilda says:

    This is so inexpensive that I won’t feel bad getting this done a couple of times a year. Thank you!

  35. May I just say….GENIUS!!!!!!! What a clever idea, and I am thinking of ways to use this method for other photos, not just my handsome son. Thank you for posting this.

  36. I love love love this, pinning and must try!!! Christine from Little Brags…and I am another bad Mom who has not gotten professional pics taken in more than 2 years…haha

  37. Great idea! Don’t sweat it; I do “pro” pix of my kids once a year…from a place like JC Penney, LOL. I have a giant frame with no idea what to do with it so getting a fun black & white photo of the kids printed up may just be the ticket to home decor happiness. Visiting from Nifty Thrifty Sunday.

  38. Cindy says:

    Wow, I LOOOVE those photos. I actually prefer this to those pretentious “professional” shots that are all “look at our perfect family in our designer jeans and matching white shirts and perfect hair” carp. What you’ve done is to show the true beauty of your children! We need more of this in all of our lives, and less of the fake perfection. Thanks for the inspiration.