A filing cabinet makeover with contact paper is a great way to add a personal touch to an ugly, boring piece of furniture for your home office. Let me show you how to transform an old file cabinet into a stylish and functional piece in under a few hours!
One of the easiest ways to give a file cabinet a makeover is by painting it. Been there done that. I painted a metal filing cabinet with black paint a few years ago and it looked great, but THIS way to flip an old metal cabinet is even easier and should be a little more durable too.

Above is my old painted filing cabinet with frames glued to the drawer fronts for a nicer look. It worked ok, but I did find scratches on it as time went on.
By the way, not in the mood to DIY an old file cabinet? Check out 5 awesome decorative file cabinets from Amazon here.

Or you can see more DIY filing cabinet makeovers here!

Let’s get back to the current project at hand. Even though I’m calling this a DIY file cabinet makeover, we aren’t building anything just giving it a huge facelift. Forgo the wood, wood glue, circular saw, pocket hold jig, and just grab an old filing cabinet with some wallpaper!
I can’t wait to show you how to makeover an old ugly cabinet in under two hours with some peel and stick wallpaper or even contact paper. First, let’s take a look at the old filing cabinet.


Time to give it a makeover!
Choosing the Right Materials
Here are some tips for choosing the right materials for your DIY file cabinet makeover. First step, choosing the wallpaper.
Selecting the right wallpaper/contact paper
The actual wallpaper product is an essential material for any DIY file cabinet makeover. When looking for a good product, there were a few things I was looking for.
First thing, I made sure it was a durable, thicker wallpaper/contact paper product. Since there is a good chance the surface of the cabinets will be touched continually, make sure not to get a super flimsy wallpaper product that will tear easily.
Second, purchasing a waterproof (aka wipeable) product is a good idea (but not necessary).
Third, make sure you love it and it will blend well in the space where it will sit.
Disclosure; this post contains affiliate links. As an Amazon Associate I earn from qualifying purchases. This disclosure statement refers to the rest of the Amazon links in this post.
Peel and stick wallpaper from Amazon
I chose two different types of wallpaper from Amazon that were durable and waterproof:
- WENMER Geometric Hexagon Peel and Stick Wallpaper
- Vary Paper Navy Blue Wallpaper Peel and Stick Wallpaper

One tip; Hindsight I wish I had purchased the 32″ wide wallpaper for the sides of the filing cabinet. This would have eliminated the need to run two rows instead of one. Make sure to use a tape measure and know your file cabinet dimensions. Learn from my mistakes!
Choosing Hardware
Hardware, such as drawer pulls and handles, can add a touch of style to your file cabinet. Replacing the original hardware can really elevate the look of the cabinet. Also take a good look at the existing hardware like drawer slides to see if they need to be replaced.
I originally planned to remove the pulls from the cabinet and possibly spray paint them a different color. Once I pulled the file drawers out and looked at the cabinet, I realized I couldn’t remove them without removing the door fronts so I opted to not paint them (or rather, I couldn’t).
Preparation Steps
Cleaning the File Cabinet
Before starting a DIY file cabinet makeover, it is important to clean the cabinet thoroughly. This will ensure that the wallpaper adheres properly to the surface.
To clean the file cabinet, one can use a mild detergent or a mixture of water and vinegar. Then, apply the cleaning solution to the surface and scrub gently with a soft-bristled brush. Finally, rinse the cabinet with water and let it dry completely.
Filing Cabinet Makeover with Contact paper
I won’t go into all the details of what it takes to apply the peel and stick wallpaper. If you want more details on that I have a post on how to apply contact paper to a table top with all my tips and tricks. I also have an entire post and video tutorial on applying wallpaper with peel and stick and the old paste on product.
Long story short, I started in the back right corner of the metal filing cabinet and applied the navy peel and stick wallpaper all over the sides and top drawers. It took four rolls to complete this. Like I said earlier, I wish I had purchased the 32″ wide roll that would have covered the entire side in one swoop.

Next I used a screwdriver to pull as much off the faces of the drawers (which ended up being just the rectangular plates).
I took the decorative gold and white wallpaper and started to apply it to the drawer faces.

My original plan was to place a small strip of navy wallpaper on the front of the drawer around the pulls, but when I tried it, I realized it just didn’t look good. Final step, take a good look at the cabinet and see if there are any air bubbles you need to use a straight edge to push out. Then you should be done!

P.S. I didn’t add anything to the back of the drawer or inside the cabinet, but you can always add as much wallpaper as you want. Ready to see my new file cabinet?
DIY File Cabinet Makeover with Peel and Stick Wallpaper
It’s amazing what a few hours and a few rolls of peel and stick wallpaper can do to an ugly old metal filing cabinet.

The cool thing about using contact paper or heavy duty wallpaper is that it’s virtually waterproof and can be wiped down easily. Also, when you get tired of it, you can simply remove the peel and stick wallpaper and start over with a new idea!


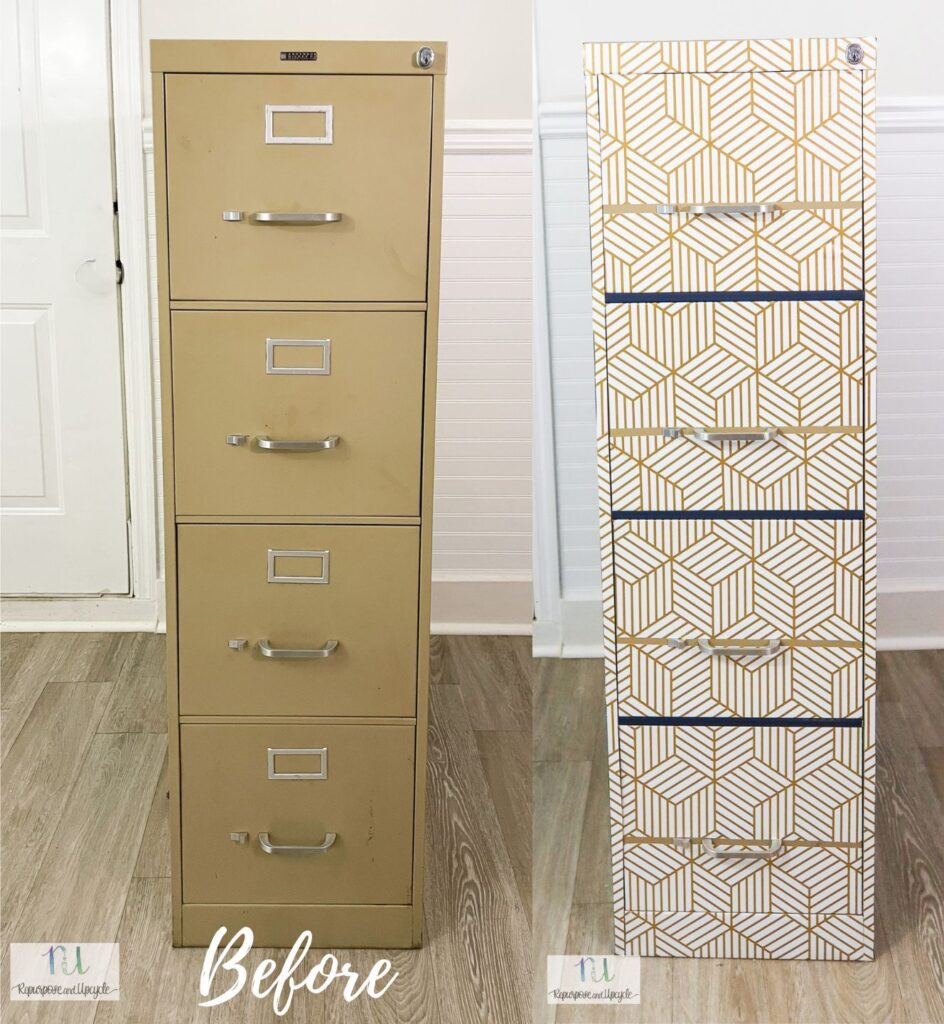
Let’s look at a side by side before and after! This is such a great up cycle and is so much easier (and more cost effective) than building your own file cabinet. Forgot the plywood sheets, pocket hole jig and pocket hole screws, etc. and grab an old file cabinet with some lovely peel and stick wallpaper.
What do you think of my new cute filing cabinet? Grab some pretty file folders and enjoy!
Make sure to watch the video of the entire process to see how easy it was to transform this old metal filing cabinet!
Thanks for stopping by!
Lindsey**


