Learn how to give a new plastic pot an aged faux concrete texture with this DIY faux stone planter hack! I’ve shared how to use spackling compound to create a faux concrete planter effect on a plastic hanging planter.
Faux stone planters are all the rave these days. No one wants pretty and clean looking plastic pots anymore, they want the real thing! We want that aged patina and worn weathered look on real stone, right? This poses a problem if you don’t want to spend a lot of money(whew those aged pots can be pricey). Also, I haven’t seen many stone hanging planters for our new outdoor space. That’s when I decided to make my new hanging plastic pot look old with a DIY faux stone effect with spackling paste. Let me show you!
This isn’t my first rodeo with making new pots look aged. As a matter of fact, I did another project on how to age a few pots with joint compound. It works the same as the spackling paste. I have found many uses with DIY projects for spackling paste over the years. I even shared how to make new wood look weathered with this stuff!
Let’s get back to this faux stone DIY project;

Disclosure; this post contains affiliate links. As an Amazon Associate I earn from qualifying purchases. This disclosure statement refers to the rest of the affiliate links in this post. See more on my disclosure page.
Here is my new plastic planter from Walmart in all it’s plastic glory! I purchased the plant and the hanging planter together, but you can get a handful of these plastic planters without plants for a decent price.
When I purchased two of these I had no intention of giving the pot a makeover. After I got home and hung them, I realized how boring they looked! I even struggled to get the price tag off the plastic surface of the planter.


They look so cheap! I wanted to give them an upgrade. I thought about painting the plastic. Naaaahhhh. I needed more than paint, I needed texture!
I pulled out my old trick that I’ve used previously. This is such a fun and easy way to update a pot with spackling compound. You can also use joint compound for this project too.
Side note; I used whatever spackling compound I had on hand. This happened to be INTERIOR spackling compound. I made it work by applying a spray sealer after it dried. If you are purchasing product for this project and you are going to use it outside, I would make sure to purchase an OUTDOOR product. They make joint compound and spackling compound specifically made for outdoor use.
Materials to make faux stone planters
- Plastic pot, hanging planter, your choice of a planter
- gloves
- spackling compound or joint compound
- dark paint or dark wax
- Spray sealer
- paint brush or sponge brush (optional)
How to make a faux concrete planters with spackling compound
- Apply gloves
- Grab a good amount of spackling compound with your hands
- Apply a thick layer of spackling over the entire surface of your pot
- Use your fingers to “stipple” the spackling
- Let it dry overnight (or atleast 4 hours)
- If you need to add more compound or have some spots you missed, repeat steps 2-5.
- With the same stippling method, apply a small amount of dark wax or dark paint over the spackling with a clean gloved hand (you can also use a brush/sponge and use a dry brush method to apply the dark wax).
- Use a spray sealer to cover the entire surface if you did not use exterior spackle.
- Enjoy your new aged planter!
Tips to make a new pot look aged
A few things you can do to make the pot look more aged:
- Mix a little dirt or moss to the spackling compound before you apply it.
- Mix a little dark green and dark yellow paint in with the dark wax or dark paint.
- Use a fine grit sandpaper to create different textures
- Tear up pieces of paper (tissue paper works best) into thin strips and mix into spackling compound mixture or apply with mod podge
- You can also apply the dark wax with a clean paper towel. Dip the paper towel into a small amount of wax and lightly wipe the surface of the planter.
Side note; Don’t cover the bottom of the planter with spackle because you want it to drain properly. There are usually small drainage holes on the bottom. If for some reason you don’t have any drainage holes and you plan to use real plants, get a drill and add some holes and DON’T cover them in spackle.
Below is the spackling paste I used. Like I said before, I pulled out whatever I had in our garage. If you are going to purchase it and you know it will be for an outdoor project, go ahead and get an outdoor spackling product. This product worked just fine because I sealed it with a spray sealer.
You can also use Plaster of Paris but in my opinion it’s a little harder to mold and work with.


Grab a big handful of the product for the first coat. You can also use a putty knife to apply it but I find that using my hands creates a more “authentic” texture and it’s the best way to get enough compound to cover the surface.
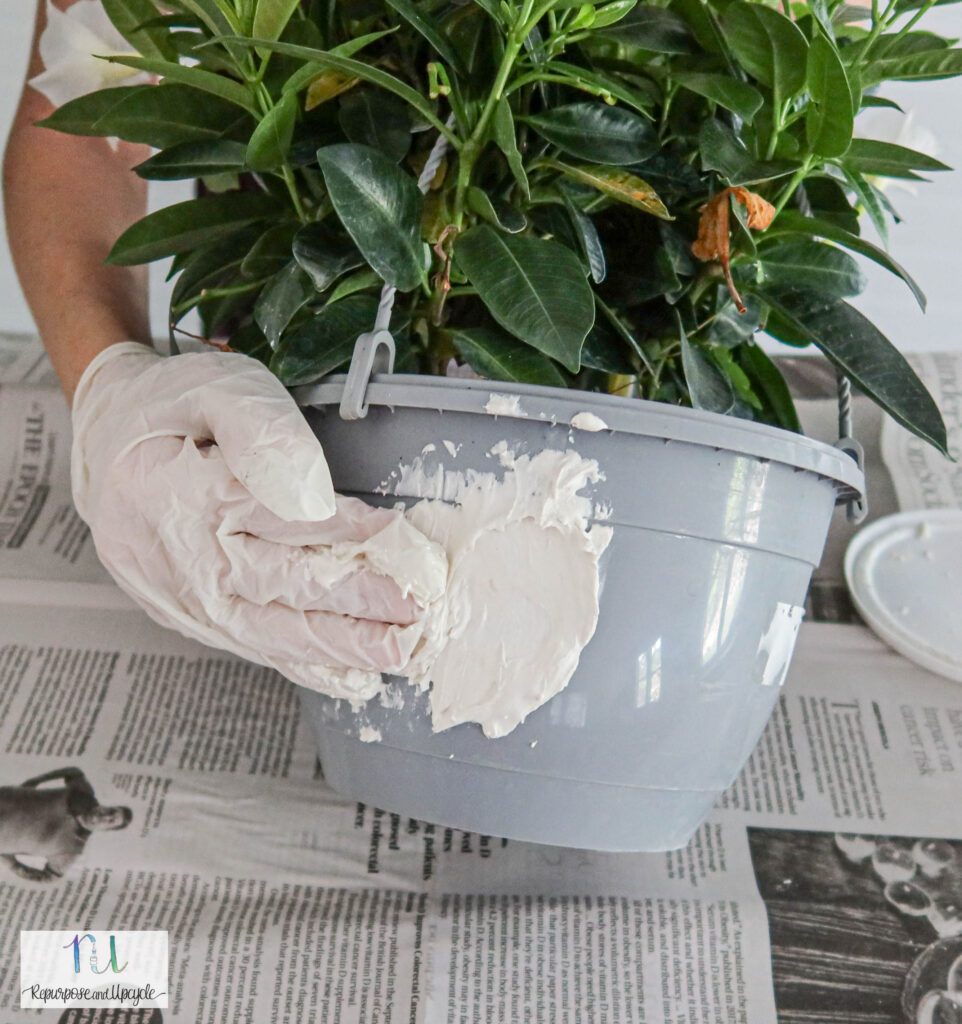
Now for the best part; applying the spackling to the pot. My kindergartener even helped me with this project! She said it was like playing in the mud! Honestly y’all, it is! It’s good for the soul to get your hands dirty every now and then and let the creative juices flow. LOL!

Here’s a view of what the new plastic pot looked like with a little spackle paste.

Once the surface has been completely covered, take your fingers and “stipple” the surface.
This is the key to creating a texture to make it look more aged. As far as how much “stipple” you need to create, that is a personal preference. If you need more compound after the first coat is dry, apply a second coat.
Make sure the compound is fully dry before moving on to create the aged look with wax (or paint).
The next step is to add some dimension to the “aged pot” with a little dark wax. You can also use dark craft paint for this too.

Once again I’m using my gloves to apply the wax. You can also apply the wax with a brush or paper towel if you choose to. I prefer to use a clean set of gloves to apply it.

Just a dab will do it! You can see how I barely touched the surface with the dark wax and it created a really nice looking aged texture. The dark wax against the white spackle creates dimension and brings out the texture better. Like I said, you can also use a brush to lightly apply the wax too. You would apply it with a dry brushing method being careful not to apply too much wax.
The dark paint or wax makes it look like the pots have peat moss on the surface.
Once you add as much dark wax to the pot as you want, let it dry and then apply a spray sealer if needed.

You can see that I covered the plants with a grocery bag before I sprayed one application of this spray sealer.
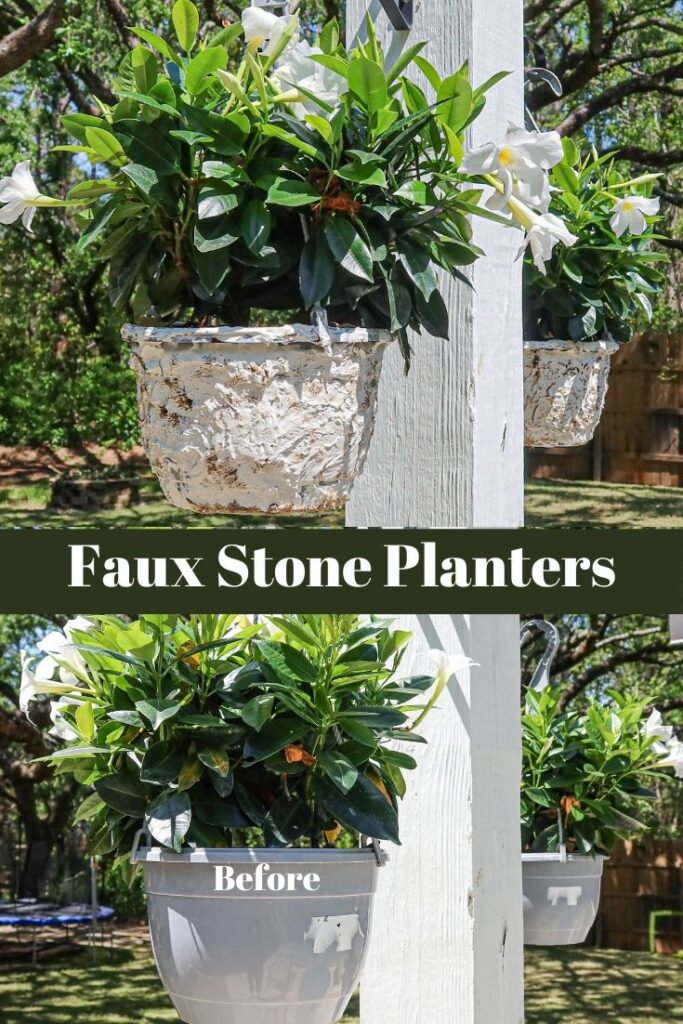
Once the spray sealer is dry, sit back and enjoy your new aged hanging planter.
What a difference a little spackling can make!
Post update: One year later and lots of crazy humid and wet weather and I can say these planters look as good as the day I created this post.


What do y’all think? What could you transform with a little spackle or joint compound and your own DIY idea?
Thanks for stopping by,
Lindsey**
DIY Faux Concrete Hanging Planters with Spackling Compound

Learn how to give a new plastic pot an aged faux stone texture with this DIY faux concrete planter hack! I've shared how to use spackling compound to create a faux stone effect on a plastic hanging planter.
Materials
- Plastic pot, hanging planter, your choice of a planter
- gloves
- spackling compound or joint compound
- dark paint or dark wax
- Spray sealer
Instructions
- Apply gloves
- Grab a good amount of spackling compound
- Apply a thick layer of spackling over the entire surface of your pot
- Use your fingers to "stipple" the spackling
- Let it dry overnight (or atleast 4 hours)
- With the same stippling method, apply a small amount of dark wax or dark paint over the spackling
- Use a spray sealer to cover the entire surface
- Enjoy your new aged planter!
Notes
I used whatever spackling compound I had on hand. This happened to be INTERIOR spackling compound. I made it work by applying a spray sealer after it dried. If you are purchasing product for this project and you are going to use it outside, I would make sure to purchase an OUTDOOR product. They make joint compound and spackling compound specifically made for outdoor use.


