Let’s talk about Installing Malibu Wide Plank engineered hardwood flooring. This type of flooring is made up of multiple layers of wood veneers that are glued together and topped with a hardwood veneer. Unlike traditional hardwood flooring, floating engineered hardwood can be installed over a variety of subfloors, including concrete, without the need for nails. I can’t wait to show you how I installed it over my existing LVP.
One of the benefits of floating engineered hardwood flooring is its ease of installation. Our lovely Luxury Vinyl Planks have never looked the best, so I couldn’t wait to cover them. And cover them is exactly what I did. Since the planks interlock with each other, it was easy to create a stable and durable surface that is resistant to moisture and temperature changes.
Disclosure; this post contains affiliate links. As an Amazon Associate I earn from qualifying purchases. This disclosure statement refers to the rest of the Amazon links in this post.
The old LVP and why I’m replacing it
The luxury vinyl planks were installed right before we moved in over four years ago. I was hopeful they would last forever because after all, vinyl is known for its durability right? Sadly in our case, this LVP wasn’t installed correctly to begin with (it wasn’t installed by me) and it has shown major gaps since then. Not to mention the headache I’ve had with removing and cleaning the floor glue off of the planks.

You can see below all the gaps in our master bedroom planks. This is such a pain to clean because of all the dust and debris that accumulates in those grooves.

Another big frustration I have is that the LVP is extremely thin allowing all the imperfections of the sub floor to show through. You can see below what I’m talking about.

Floating hardwood Install vs. Glue or nail down hardwood Install
You are probably wondering why in the world I would float my new engineered hardwood floor. Well the answer is simple; I didn’t want to go to the trouble of pulling up our cheap luxury vinyl, cleaning all the glue below it, and more than likely having to replace the subfloor.
As a matter of fact, the old LVP is going to act as my moisture barrier. So in this case, NOT removing it is a win win.
Understanding Floating Engineered Hardwood Flooring
Floating engineered hardwood flooring is a type of hardwood flooring that is installed without the use of nails. Instead, it is installed by floating the planks over a subfloor using a tongue-and-groove system.
One of the benefits of floating engineered hardwood flooring is that it can be installed over a variety of subfloors, like Luxury Vinyl Planks (LVP), plywood, and existing hardwood floors. This makes it a versatile flooring option for many different types of spaces.
Another benefit of floating engineered hardwood flooring is that it is relatively easy to install. Because it does not require nails or (most of the time)glue, it can be installed quickly and without a lot of mess or fuss.
When choosing a floating engineered hardwood flooring, it is important to consider the thickness of the planks. Thicker planks are generally more durable and can withstand more wear and tear over time. Additionally, thicker planks often have a more solid feel underfoot, which can be desirable for some homeowners.
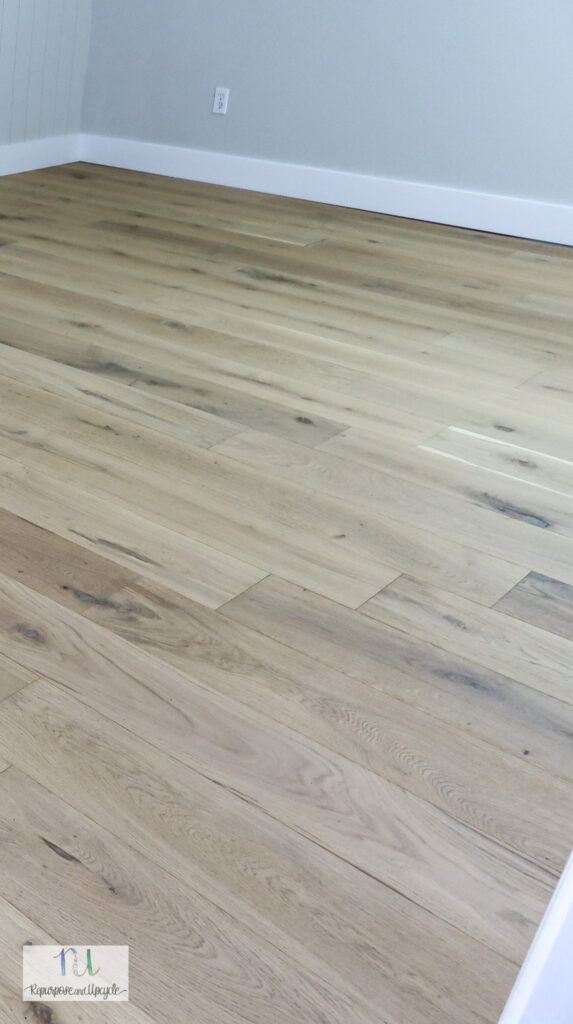
For our hardwood floor install, we chose a beautiful thick 3mm sawn face real hardwood veneer from a company called Malibu. You can purchase this flooring at Home Depot.
Grandview French Oak 9/16 in. T x 7.5 in. W Water Resistant Wire Brushed Engineered Hardwood Flooring
The cool thing about this engineered hardwood floor is that, unlike other engineered floors, it can be sanded and refinished once. This is HUGE!

I love the natural look of the wood. It has gray undertones while still being a neutral brown color.

Isn’t it pretty! In some lights it looks more brown and in others it looks like a very light neutral wood color.
Let’s talk about installing these floating engineered hardwood floors.
Essential Tools and Materials
To install floating engineered hardwood flooring, there are certain tools and materials that are essential. Here are some of the most important ones:
Tools:
- Tape measure
- Chalk line tool
- Circular saw or jigsaw
- Table saw or miter saw
- Pry bar
- Hammer
- Nail gun or stapler
- Tapping block
- Pull bar
- Spacers
- Level
- Knee pads
- Safety glasses
Materials:
- Floating engineered hardwood flooring
- Moisture barrier
- Transition strips
- Finishing nails or staples
- Wood glue
The tape measure and chalk line are used to mark out the floor and ensure that the planks are installed in a straight line. The circular saw or jigsaw is used to cut the planks to size, while the table saw or miter saw is used to make rip cuts and crosscuts.
The pry bar and hammer are used to remove any existing flooring or baseboards. The nail gun or stapler is used to secure the planks to the subfloor, while the tapping block and pull bar are used to lock the planks together. Spacers are used to maintain the proper expansion gap between the planks and the walls.
The level is used to ensure that the floor is level and flat before installation. Knee pads and safety glasses are essential for comfort and safety during the installation process.
In addition to the tools, the materials are also important. The floating engineered hardwood flooring is the main material, while the underlayment provides a cushioning layer between the subfloor and the planks. The moisture barrier is used to prevent moisture from seeping up from the subfloor and damaging the planks.
In my case, I didn’t install a moisture barrier because like I said before, the old LVP acted as the moisture barrier.
Transition strips are used to create a smooth transition between the hardwood flooring and other types of flooring. Finishing nails or staples are used to secure the transition strips to the subfloor. Wood glue is used to secure any loose planks or transition strips.
Preparation of Installation Area
Leveling the Floor
Leveling the floor is a must. Luckily in my case, I didn’t have to do any leveling because the floor was pretty good. It wasn’t perfect, but good enough. Since the planks are very thick, it helped to hide any imperfections in the existing floor.
If you are laying a floor over an uneven surface, you need to use a leveling compound to fill in any low spots in the subfloor. This compound should be allowed to dry completely before moving on to the next step.
Acclimatizing the Wood
To acclimatize the wood, I removed the flooring from its packaging and allowed it to sit in the house for 48 hours before I began the install process.
Installation Process
Laying the Underlayment
Before installing the floating engineered hardwood flooring, the underlayment must be laid down. The underlayment is normally a thin foam sheet that helps to reduce noise, absorb moisture, and provide a cushioning effect.
Like I said before, I’m using the old LVP as the underlayment and moisture barrier. So I was able to skip this step!
Installing the First Row
It is important to start the installation from the longest wall and it’s best to use an outside wall. In my case, since we installed so much flooring, I decided to start on the outside wall in my sons room and work my way out. Malibu says to always install the floor from left to right.
The first row is installed by placing the tongue side of the board against the wall and the groove side facing out. The boards are locked together by sliding the tongue of one board into the groove of the previous board.
Since I am floating the floors, we measured out from the wall the length of one board plus the expansion space dimensions and then dropped a chalk line to make sure we were installing the floors straight. Once the chalk line was placed, I nailed an old trim board to the floor and used this board to place the first hardwood planks.

Continuing the Installation
After the first row was installed, the rest of the flooring was installed fairly easily. The boards are installed in a staggered pattern, with the end joints of adjacent rows being at least 6 inches apart. It is important to maintain a 3/4 inch gap between the flooring and the wall to allow for expansion.
This particular flooring requires that when floating the boards, carpenters glue needs to be placed on all plank butt ends before fitting the tongue and groove pieces together.
Finishing Touches
Trimming and Baseboards
Once the floating engineered hardwood flooring was installed, we added the baseboards. Baseboards are an important part of finishing the floor. They cover the gap between the flooring and the wall, giving the room a polished look.
I chose to install a modern and clean looking primed 1 by 6 as my baseboards.
I love how clean and modern it makes this space look!
I’m not going to go into all the details on how I installed the floor because, well, I’m not a pro. I will say that these floors made it easy for me, an avid DIYer, to complete the install.
My new Malibu Wide Plank Engineered Hardwood in the Color Grandview
I’m smitten with how my new floor. Don’t you think it’s added so much value to our home? As silly as it sounds, I almost feel like I have a new home!

I think it accents the cedar wood beams and my DIY modern floating desk perfectly.

You can see more of how I created this DIY tone on tone feature wall here.

See more of my kitchen and all the updates I’ve made to it here!

This flooring has truly complimented my cottage style master bedroom look.
Conclusion
One of the main benefits of this type of flooring is its ease of installation and durability. Also, floating engineered hardwood flooring is more resistant to moisture and temperature changes than traditional hardwood flooring, making it a great option for areas with high humidity or fluctuating temperatures. This is another reason why it was the perfect option for my rustic beach cottage.
I hope I’ve given you a quick and helpful rundown of how to install the Malibu Wide Plank Engineered Flooring to create a beautiful new floor for my home!
Thanks for stopping by!
Lindsey**


