DIY Cane cabinet doors offer a refreshing update to old glass doors, wooden doors, or any kind of surface. If you are looking to exchange a solid wood panel or glass panel with a touch of organic warmth, like with a little cane furniture, then this post is for you! The use of cane webbing—a durable and flexible rattan product—allows for customization to lots of types of cabinet doors; and I’m not only talking about kitchen cabinets but living room cabinets, dining room cabinets, bathroom cabinets and stand alone pieces of furniture too.

The process of creating these cabinet doors involves replacing the central panel of existing doors with cane webbing. Cane is trending now, and I love the way it looks. It’s also super helpful for TV stand cabinets or media centers where you don’t want your technology totally enclosed, but you do want to hide those ugly boxes from sight.

A few years ago, I gave our TV console a makeover with cane webbing. I removed the old glass doors and added some traditional cane webbing for a simple DIY project. While I loved the way it turned out, I cut some corners when I installed the Cane webbing (causing some sagging later on), and I’m here to show you how to do it the right way.

I will be replacing this traditional cane webbing with an open box weave cane webbing (sometimes called radio weave). That being said, any type of cane for this project will work too. I can’t wait the process with you.
Tools and Materials
Here are some tools needed to attach the cane to the cabinet doors:
Tools:
- Measuring tape: To measure the dimensions of the cabinet doors.
- Drill (optional): For making pilot holes and attaching hardware.
- Staple gun or nail gun: To affix the cane webbing to the wooden frame.
- Scissors: For cutting the cane webbing.
- Sandpaper (optional): To smooth out the cut edges of the wood.
- Paintbrush or roller (optional): For applying paint or finish to the wood.
Materials:
- Wood or Cabinet faces: The frame for the cabinet doors
- Cane webbing or cane panels: The material to be inset into the door frames
- Wood glue (optional, hot glue works too): To secure joints in the wooden frame
- Hinges and screws: For attaching the door to the cabinet body.
- Handle or knob (optional): For the functional opening and closing of the door.
Measuring and Planning
Taking Accurate Measurements
First thing, make sure to measure the door or panel opening.
Materials Needed:
- Measuring tape
- Notepad and pencil
- Straight edge or level
Use a measuring tape to determine the height and width of each opening to the nearest 1/16th of an inch. Record these dimensions in a notepad, noting the corresponding cabinet location. Over the years I’ve learned that nothing is square and it’s always best to measure each side, and then measure again!
Preparing the Cane Webbing
Before starting your project, the cane needs to be cut to the appropriate size and sufficiently soaked to be pliable for installation. Make sure not to skip this step!
Cutting the Cane to Size
First step, measure the cabinet door’s frame where the cane webbing will be installed. Add at least two inches to each dimension to allow for a secure fit. Using sharp scissors or a utility knife, cut the cane webbing carefully, ensuring straight, clean edges to avoid fraying.


Soaking the Cane Webbing
Cane webbing must be soaked to become flexible enough for installation. Submerge the webbing in room temperature water for approximately 30 to 60 minutes. Check the material occasionally; once it feels pliable, it is ready to be attached to the cabinet door. Avoid over-soaking, as this can weaken the fibers. If you don’t soak the cane, it will be harder to pull tight and might buckle after some time.

After I let the webbing sit in the water for about an hour, I laid them out on a towel to drip dry.

Attaching the Cane Webbing
Securing the Cane to the Frame
After soaking the webbing in warm water for 30 to 45 minutes, it becomes pliable. Position the webbing on the frame, making sure to align it evenly. Groove pins or caning wedges can then be used to secure the webbing into the frame’s groove. This is suggested to do, but not always necessary.
- Steps:
- Soak cane webbing
- Cut to size
- Place on frame
- Secure with groove pins or wedges
Pro tip: When you position the cane, make sure to look at the cane pattern or radio weave and make sure it looks straight.
Also, the shiny side of the cane is the side that needs to face out.
Using groove pins and caning wedges is the best way to install the cane and pull it tight for a super secure fit. That being said, sometimes existing cabinet faces don’t have grooves. So what now?
What if you don’t have grooves to push the pins or wedges into?
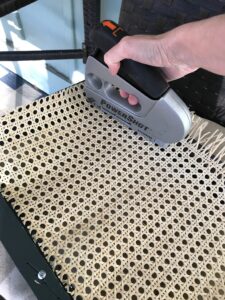
It is best to secure the cane webbing into a groove with a wedge or pin, but sometimes you don’t have that option. This is the case with my TV console. Since I didn’t have any grooves, I opted to use screen spline to secure it to the corner of the doors with staples. You can also use regular caning spline. I happened to have screen spline on hand so that’s what I used. Let me show you.

I started by pulling the webbing as tight as I could, then placing the spline in the corner of the cabinet while securing the webbing, then stapling it.

Below is what the webbing looked like after I secured it with spline and staples.

Here’s a front view of the radio weave on the cabinet door.

Trimming Excess Cane
Once the cane webbing is securely in place and dried (which typically takes about 24 hours), the excess can be trimmed. A sharp utility knife should be run carefully along the inner edge of the groove, ensuring not to cut into the frame or the secured webbing. Always cut away from your body to avoid injury.
- Tools Needed:
- Utility knife or sharp scissors
- Slicing motion away from the body

I cut the majority of the slack with scissors and then went back with a utility knife to clean things up.
What would look really nice to finish this cabinet would be to add some small moulding on the front to hide the edges and the back of the cabinet door to place over the spline. It doesn’t look bad now, but it would really look nice with some moulding. Another day another project right!
Cane webbing mistakes
When I first installed the cane webbing to the media console years ago, I simple stapled it to the edges and I did not soak the cane.
Over time it started to buckle and did not create a smooth and tight fit. When you soak the cane, it also allows it to stretch a little. While you can stretch it is when you install it and pull it tight. After it dries, it shrinks a little making a very tight fit. NOT soaking it is one of the ways I went wrong. Learn from my mistakes.
You can see below where the cane has started to pull away from the staples. This is where a cane spline is so important because it helps to keep the webbing tight.

DIY Cane Cabinet Doors
I’m pleased with how the new radio weave looks on our old TV console. A little moulding would make it look even nicer, but I’ll save that for another day.

Looking to paint cane webbing? I’ve got a post on how to paint cane back dining room chairs.

Frequently Asked Questions
How can I retrofit cane webbing into an existing cabinet door?
To retrofit cane webbing into an existing cabinet door, you should remove the door first. A groove should be created around the inside edge of the door frame to accommodate the cane webbing, ensuring it is the proper size and shape before securing it in place.
What is the best way to secure cane webbing in a DIY cabinet door project?
The most effective method to secure cane webbing is by using a spline and a special wedge tool to press it into a pre-cut groove within the cabinet door’s frame. Once in place, the webbing should be glued (and or stapled too) and left to dry for a solid hold.
Can cane webbing be applied to doors with existing glass panels?
Yes, cane webbing can replace glass panels. First, carefully remove the glass and any holding components, then prepare a groove for the cane webbing, and install the webbing as they would in a standard door retrofit.
What materials are needed to create a DIY cane cabinet door?
Materials needed include cane webbing, a spline, a chisel or router for creating the groove, wood glue, a cutting tool, and a wedge or small hammer to secure the webbing. Optional materials might include a varnish or sealant for the finished door.
Is it necessary to treat cane webbing before using it on cabinet doors?
Pre-treatment is not always necessary but it’s advisable to soak the cane webbing in water to make it more pliable before installation. After installation, a sealant can be applied to protect against moisture and wear.
How do I measure and cut cane webbing for custom rattan cabinet door designs?
Measure the door frame’s opening and add at least two inches around the perimeter to ensure there is enough material to fit into the groove. Cut the webbing with a sharp utility knife or scissors, checking the fit within the door frame before securement.
I hope I’ve given you all the details needed to complete your own cane project! Thanks for following friends!


