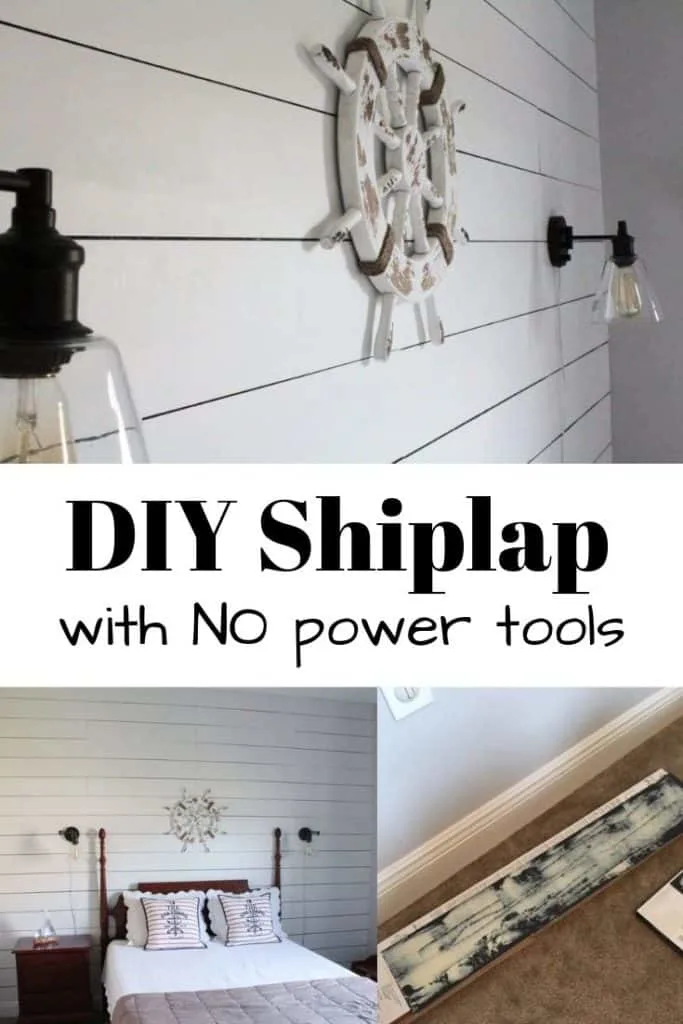
A tutorial on how to create a faux shiplap wall or planked wall without using any power tools. This process involves using peel and stick vinyl flooring.
SHIPLAP; The new buzzword in home decor. Everyone wants to have it but can everyone make it? YES! Can you really create shiplap with NO power tools? Well guess what, you’re in luck, because I created a SHIPLAP (or faux shiplap wall) with only using a few supplies and NO POWER TOOLS!

I’m guessing that since you’re reading this you might be a new DIY’er? Or perhaps you might be someone who wants to join the “shiplap train” but doesn’t want to hassle with cutting wood (this was my motivation)?
Maybe you’re just curious and want to know how to create an easy DIY planked wall with no power tools.
I’ll try to keep this short and simple, just like this project!
Disclosure; this post contains affiliate links. As an Amazon Associate I earn from qualifying purchases. This does not affect the price you pay. This disclosure statement refers to the rest of the Amazon links in this post. See more on my disclosure page.
Materials for DIY faux wood wall
- vinyl wood plank flooring
- floor glue
- scissors or a box cutter
- paint
- straight edge
- spatula used to spread the glue
- penny or spacer
- Paint brush and fine finish roller
First you need to decide what kind of floor product you will use.
I searched for the cheapest vinyl plank flooring I could get for my faux shiplap wall.
Here is what I ordered.
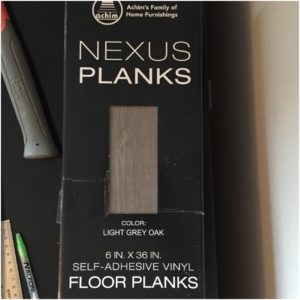

I purchased these online and you can find a very similar product HERE. Because I knew I would be painting the vinyl (or my faux wood wall), it didn’t matter what color I purchased.
Any floor glue should work, this is just the product I chose. Note: my planked wall is about 110 square feet. I was hoping a quart would be enough, but it turned out that I needed about a half a gallon.
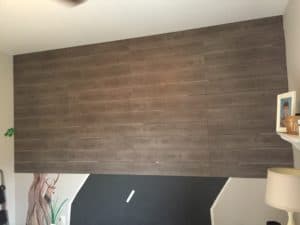
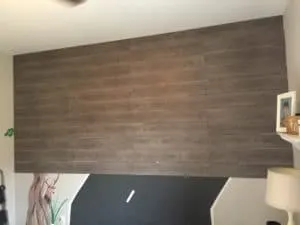
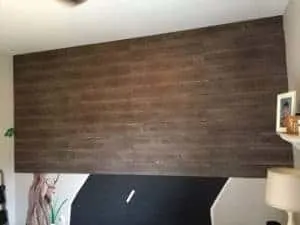
DIY Faux Shiplap wall with vinyl floor planks
- peel the back off of the vinyl flooring.
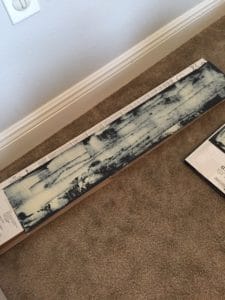
- spread a decent layer of floor glue on the back of the vinyl (pictured below)

- WAIT AT LEAST 5 minutes. This is an important step and I learned the hard way that you need to let the glue “sit” and get a little sticky so it will stick on the wall. I found five minutes was key. I applied the glue to about 5 planks at a time.
- Start by applying the planks to one of the top corners of the wall. I started at the top left. When I got to the right side, I had to cut the vinyl plank in half. I measured how much I needed to cut and used a straight edge and scissors. Easy peasy!

- After the first row of planks were up, I used a penny to create a tiny space to make it look like real “shiplap.”

Progress!
6. The next step was a tedious one! I bought cheap black paint and used a thin paintbrush to paint in between the vinyl floor lines. Since I painted the actual vinyl, I didn’t worry about being messy or keeping the black paint in the lines.
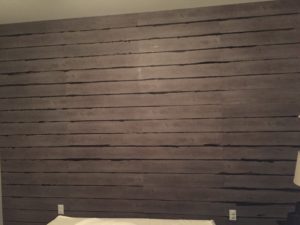

7. The next step is my favorite one; PAINTING the SHIPLAP! A few words of wisdom from experience; Use a FINE FINISH ROLLER.
The surface is not flat due to the spaces in between the planks, so you don’t want to paint the black lines. I found that a fine finish roller almost eliminated the issue of accidentally painting the black lines.
I did have to go back and touch up some of the lines after I painted the planked wall.
Side Note: Since I’ve published this post I’ve had a lot of comments regarding the black paint lines in between the boards. If your walls are a solid medium or darker shade, then it would be easier for you to paint the boards white first before you glue them to the wall (and you probably wont need to paint in between the planks).
Since I had a multi colored mural behind the wall, I had to paint the wall a solid color first, or paint black lines in between. I thought it would be easier to paint the black lines in between the boards.
A word of caution: Using floor glue to attach the vinyl to the wall is fairly permanent. If you ever plan to take these boards down, you will most likely need to re drywall.
My advice, if you’re only wanting to create a temporary WOOD PLANK WALL, you might not want to use this method. Just keeping it real and honest y’all.
That being said, I figured I would also share how to create Sharpie Shiplap because this also doesn’t require power tools.
That’s it for my shiplap with NO power tools!
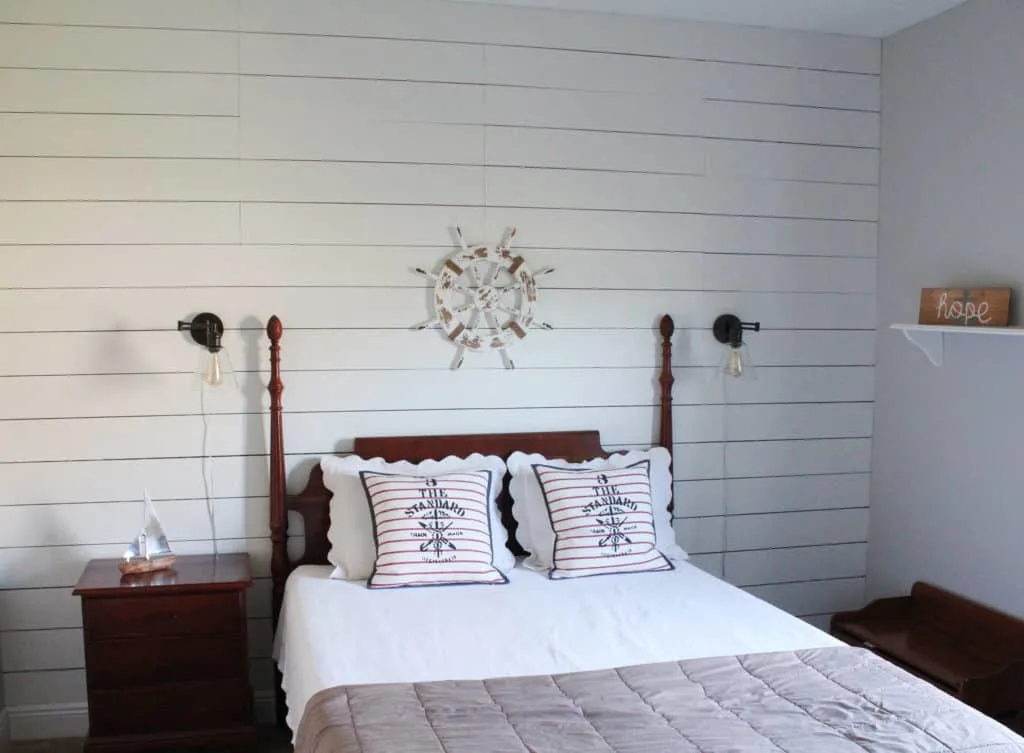
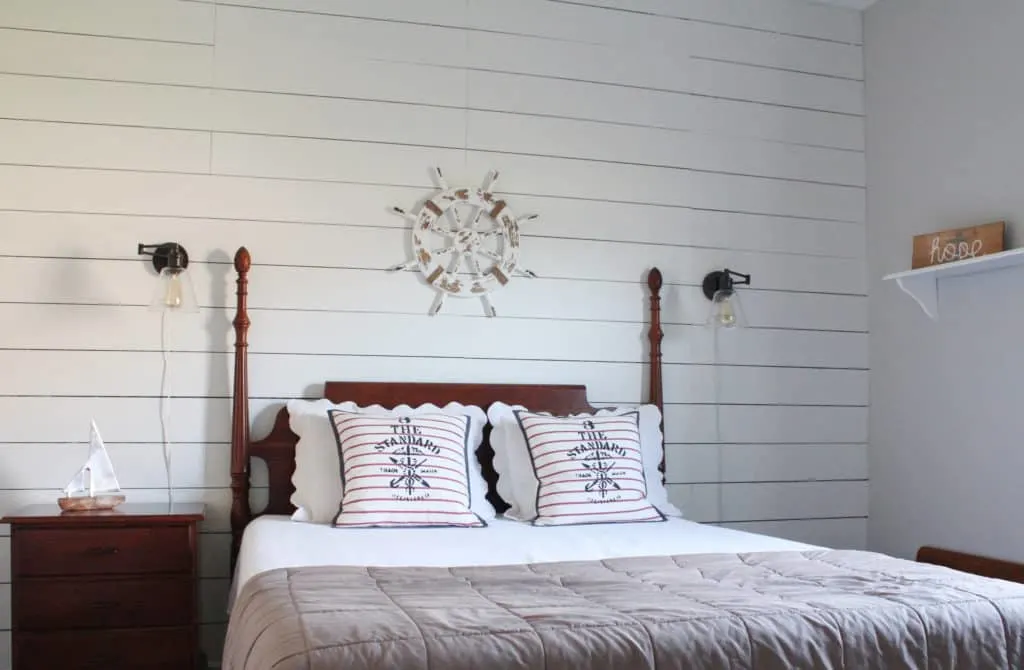
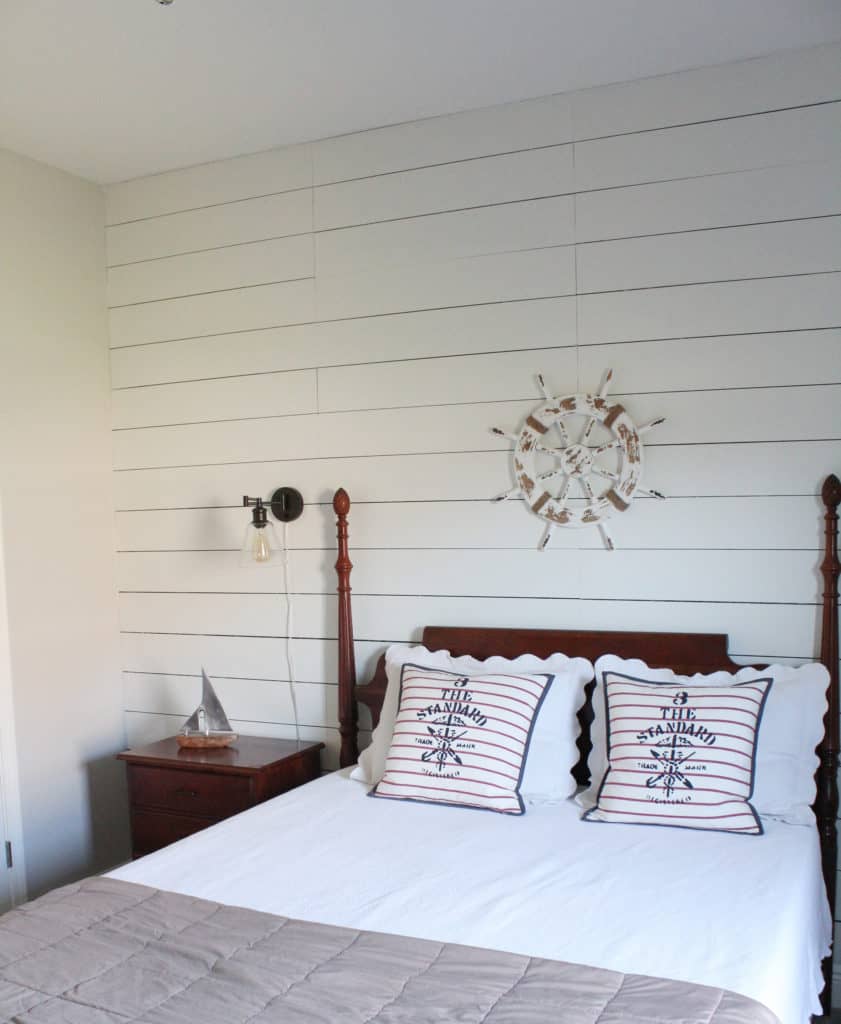
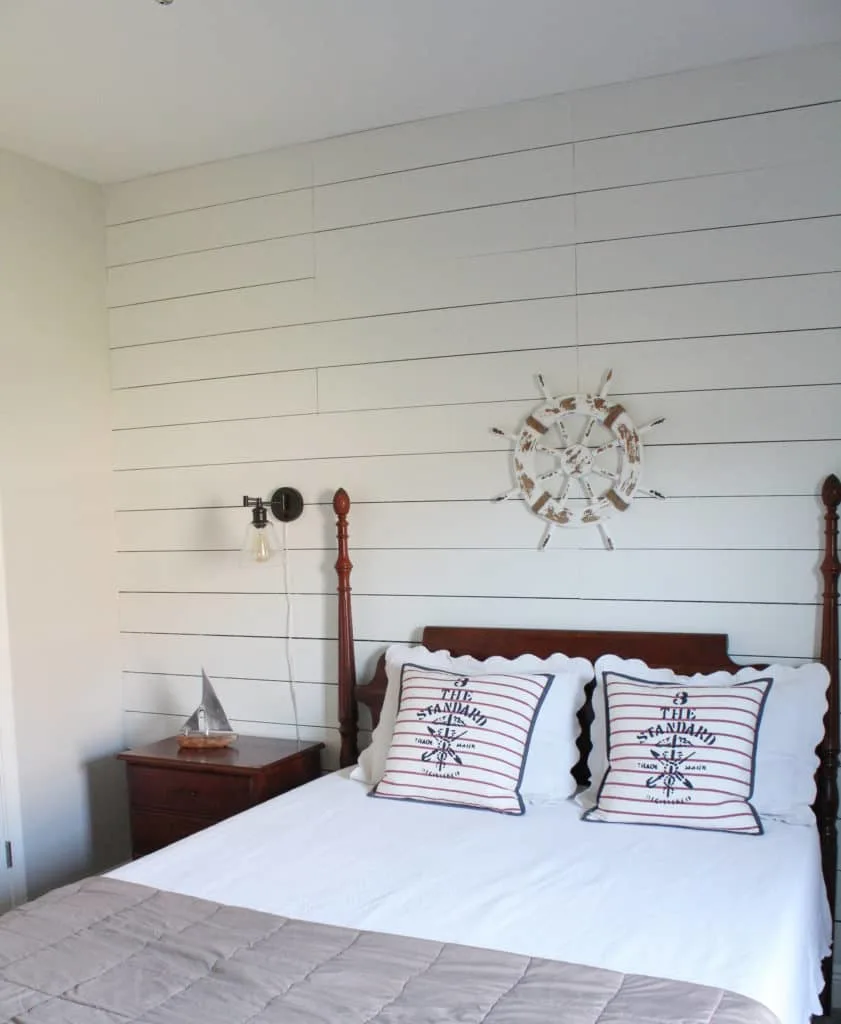
As you can see I completed this for my son’s room and finished it with a “nautical” theme. I love it.
The entire faux shiplap wall with supplies cost around $110.


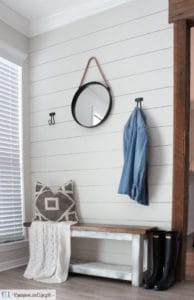
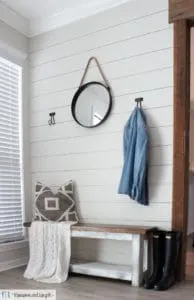
I love the look of a feature will with shiplap, board and batten or even picture moulding.
Just because you don’t have a handyman in your back pocket or the skills of a seasoned DIYer doesn’t mean you can’t have your own shiplap wall. So gather up your materials and start channeling your own inner ‘Chip and Joanna Gaines.’
Lindsey**
If you enjoyed this post I would love for you to Pin it HERE. Or you can Pin the image below.

Lovely! Why did you have to put floor glue on the adhesive vinyl planks?
The adhesive for the vinyl wasn’t strong enough to adhere to the walls. So I added the floor glue to make sure they wouldn’t fall.
How would you do this on a ceiling please?
If you do it on a ceiling I would use a finishing nailer to ensure that they don’t fall.
Hi! Loved it, I want to try in in my living room but I am thinking about nailing it to the studs to avoid the glue damage if I ever want to tear it down. Do you think that would work?
That would work great!
[…] real the Sharpie shiplap looks! Speaking of Shiplap, I’m no stranger to creating my own DIY shiplap. In our old house I made over a wall with Shiplap with NO power tools! This time around, though, I […]
It’s beautiful but the person that gets to take it down will say lots of ugly words, lol.
LOL yes you are right! Let’s hope it won’t be coming down!
[…] Shiplap on a bedroom wall; Image source: repurposeandupcycle.com […]
I’d like to put up shiplap look walls in my dining room, but there is a chair rail. It’s painted right now, but I’d like to wallpaper the bottom. What do you think? Other ideas?
I’ve seen a lot of designs where they have shiplapped below a chair rail, and wallpapered the top. But I can’t say I’ve seen it the other way around. That would be interesting! Either way I love shiplap accented with wallpaper above or below!
Can’t wait to try this out!
I hope it works out! Let me know
[…] To see more of my post on creating this Shiplap with NO power tools click HERE. […]
[…] I have become very familiar with adding different types of wood to my walls. I’ve created a faux shiplap wall with no power tools, an easy DIY board and batten with minimal materials, and now I’ve decided it’s time to […]
[…] Shiplap, bead board, board and batten, anything to add character to your walls screams “FARMHOUSE VINTAGE” style. we recently installed bead board as a kitchen backsplash and I LOVE IT! I think it really creates a cozy, cottage vibe. I also created my own SHIPLAP, with no power tools. […]
[…] Shiplap with No Power Tools from Repurpose and Upcycle […]
… [Trackback]
[…] There you will find 84705 more Infos: repurposeandupcycle.com/shiplap-with-no-power-tools/ […]
Looks GREAT!!! What size is your finished wall? Not sure I saw that? I tend to look…then read!! LOL! I have a pretty large wall I want to do in my living room!! Thanks!!!
My wall is 110 square feet. Good luck if you attempt it! I’m so pleased with the way mine turned out. Blessings!
[…] Shiplap with no power tools […]
[…] SHIPLAP with NO power tools @ repurpose and upcycle […]
This is a great idea! Thanks for sharing it at Craft Frenzy Friday at Mom Home Guide!
[…] SHIPLAP with NO power tools @ repurpose and upcycle […]
[…] SHIPLAP with NO power tools @ repurpose and upcycle […]
This is awesome! What a great way to get the look that’s all the rage right now!
Thanks so much for joining the Grace at Home party at Imparting Grace. I’m featuring you this week!
Oh thank you thank you for the Feature! This made my day. Blessings!
This looks amazing! Thank you for sharing it with us at Funtastic Friday.
[…] Shiplap with no power tools […]
[…] Shiplap with no power tools […]
[…] Shiplap with no power tools […]
What a great idea! Thank you so much Lindsey for sharing your project with the Creative Circle link party!
[…] If you’re wanting to add a little interest to a wall but you don’t have a lot of tools in your tool box check out this tutorial by Repurpose and Upcycle. […]
I absolutely love this idea, Lindsey! I’ll be featuring it tomorrow at Vintage Charm #77! Hope to see you there! xo Kathleen | Our Hopeful Home
OH thank you so much for the feature!
Great job–love it!
[…] Shiplap with No Power Tools from Repurpose and Upcycle. […]
This is a great idea! Definitely putting this on my To Do List! Love your blog by the way. Found you on the Thrifty Thursday link party!
[…] you want to put up some shiplap? Repurpose and Upcycle has a great tutorial for putting up shiplap without power tools! So […]
What a great solution for a faux application! Especially for the power tool challenged! Thanks for sharing your project at Fridays Furniture Fix!
I am going to do this. Two questions: do you think the black between the planks is necessary? What kind of paint did you use? Love it!
Oh and one more thing; I used cheap white paint (in egg shell) from Wal-Mart.
Hi Carla,
I’m glad you are going to try it! As far as the black lines; this was my preference because I wanted a more “defined” line between the planks and I had a mural behind the wall so I had to cover it with something. Also, if you’re not going to do the black lines then I would suggest painting the planks before you put them on the wall. Hope this helps! Let me know how it turns out.
Lindsey
I love the idea. If I were you, I would have staggered the seams a little. I also think I would have painted the wall dark before I started and painted the vinyl flooring before putting it on the wall. And, finished by touching up if necessary. Just something to think about to see if it would have worked better. I’m glad it turned out well for you.
That looks amazing! Love it.
Great idea to use flooring. Your wall turned out wonderfully. Thank your for sharing your idea at the Snickerdoodle Create~Bake~Make link party!
I am featuring your wall at Snickerdoodle today.
Thank you so much for the feature! That really means a lot.
Lindsey
That really looks awesome Lindsey. I really wish I’d seen this post before doing our shiplap wall with power tools. This is so much easier and I often seen odd lots of faux vinyl planks that no one wants because the color is just yucky for a bargain at the hardware store.
I have a handyman but only when he’s on board with a project I want to do. Doesn’t go for much of newer ideas like shiplap walls, no matter how it’s done. We have single wide mfg. home so think shiplap wall would help insulate wall besides giving wall a new look.
People that ordered this house originally didn’t have extra insulation put in floors, walls or ceiling which would have helped temps in home during certain seasons. We lived in MT so had our dble wide there insulated better, made big difference in winter and summer. In winter gets down way below zero during/night for weeks sometimes. Here in western CO temps aren’t nearly as severe.
Love how your son’s wall looks, want to do this. Can you stagger the strips to make it look more realistic? Think would try that.
Hope you have wonderful weekend
Absalutely you can stagger the strips! That would look good! Let me know if you try it and how it turns out. Thank you for the feedback and good luck.
Lindsey
Hi Lindsey, JaneEllen again. Found this post on Fridays Furniture Fix party. Seeing this again made me even more determined to do this, first on wall in our room. We have some vinyl flooring out in shed, think might be enuf to do one short wall. Would be good way to try it, get experience. Once in while Habitat or Sam’s club has some flooring so hopefully could get some more if we decided to do wall in living room. Think would be good idea to get out what we have to see what’s what.
Need to paint bathroom and our room anyway so would be good way to get handyman interested and involved. Would like to do wall/walls in our bathroom also. Oh what the heck,, the whole house, lol.
Your son’s wall looks so nice, love, love it. Think might have printed your post out before but will again to show my sweet handyman, try to talk him into doing this. All we’d need is adhesive and paint, and roller you specified. Must have been meant to find your post again.
Happy Mother’s Day
So glad you found this again! And good luck to you. Let me know how it goes if you complete it. Take care and happy Mothers day to you too.
Lindsey
Love how your project turned out. Nice tutorial. Thanks for sharing at the Inspiration Spotlight party. Pinned & shared.
What a concept—-I would have never thought of this, but it’s brilliant!
jodie
http://www.jtouchofstyle.com
#fdflinkparty
What a great idea; very creative and it turned out beautiful!
Best,
Kelly
I really love how your wall turned out. Great idea, too!!
THis turned out beautifully! Great job!
This looks great! I love the new trend, and I love it even more now that I know there’s an easy version! Thanks so much for sharing your method.
I love this look. I have thought about trying it. Yours turned out great!
#Pitstop
Obsessed and pinning! So excited about this post!
Thank you!
I love how this turned out! The step by step directions are perfect for a non-DIYer like myself.
Thank you! So glad it was helpful!
Do you mind sharing what type of paint you used? thank you!
Hey Hannah, it was a generic white latex paint. I’m sorry but I’m not sure what type.
What a good idea! It looks great! 🙂
Love how your wall turned out. Great job.
Hugs,
Bev
Thank you Bev!
This turned out beautifully! And I agree, you will have saved so much paint by just painting the gaps black as opposed to painting the whole wall first. Thanks for sharing at To Grandma’s House We Go. xx
Thank you!!
Awesome! Thanks for linking up at Support Blog for Moms of Boys 🙂
Such a great idea Lindsey!! It turned out fantastic!! Great job and thanks for sharing!! xoxo
Vesna – Home Chic Club
I was lucky enough to find your site from the Modest Mom linkup today and wanted to say that I really enjoyed your article. Thank you!
Thank you so much! I appreciate that comment. Have a great Monday!
Love how you created this DIY shiplap wall and thank you for sharing it at our party today. We would really love to see you post a link back to our party so we can feature it.
Blessings,
Linda
So happy I saw this. My husband and I have been thinking of doing this to save time. Can u tell me what paint you used? Thank you! It really looks beautiful!!
Hi Linda
Thank you so much for your interest in my post. I have Linked back to your website. Thanks so much
Lindsey
[…] Shiplap with No Power Tools from Repurpose and Upcycle […]
[…] Shiplap with No Power Tools from Repurpose and Upcycle […]
[…] Shiplap with No Power Tools from Repurpose and Upcycle […]
This is great! My sister has wanted to do a shiplap wall but doesn’t have the tools to do many of the other versions she’s shown me (and I live 3 states away with my tools!). Pinning and sharing. #HomeMattersParty
This is a great idea! I love the look of your wall. Thanks for sharing at the Wednesday Showcase Link party.
Hey, Lindsey! Just wanted to let you know that we loved your ShipLap With NO Power Tools so much when you shared it at the #HomeMattersParty last week, we’ve FEATURED it THIS WEEK! Hope you can check it out when you get a sec. Happy Friday!!!
http://lifewithlorelai.com/2017/03/09/home-matters-linky-party-126
~Lorelai
Life With Lorelai / Home Matters Linky Party
Would it have been easier to paint the vinyl first? It is beautiful. Great job.
To be honest, yes it might be a little difficult. If you used a lot of glue and held it for a minute you would probably be ok. But, it’s kind of iffy. Hope that helps!
I meant beadboardd…not breadboard!
For me no. Because I used black paint in between the lines I didn’t have to worry about being messy. BUT if you have a dark wall behind it, it might be easier for you to paint first.
Great simple idea. Did you prime the vinyl before you painted. With such a slick surface, I figured it might need a primer. Thanks
Hi Judy. No I did not prime and it worked great. And the finish on the vinyl was actually more of a matte.
Can you do this on a popcorn ceiling
Honestly, I wouldn’t. It needs to be a fairly smooth surface and I don’t know how the adhesive would hold up.
[…] Shiplap With No Power Tools from Lindsey @ Repurpose and Upcycle […]
[…] Shiplap With No Power Tools from Lindsey @ Repurpose and Upcycle […]
[…] Shiplap With No Power Tools from Lindsey @ Repurpose and Upcycle […]
Wow, this really turned out great! Fabulous idea. Thanks for sharing with us at Brag About It. Pinned to share.
This looks great! Thanks for sharing!!!
You did a wonderful job, it turned out great! Thank you for sharing at The Really Crafty Link Party this week. Pinned!
Wow, the wall turned out so cool. Love the details you shared. Thank you for sharing with us at #HomeMattersParty . We would love to see you again next week.